Throughout this guide you'll see user referred to in various commands/file. Ensure to replace it with YOUR USERNAME in these!
I also assume that your VM uses the default name assigned by libvirt - win10. If you give your VM a different name, you will need to ensure the same as above, and replace any occurrences of win10 in commands/files with the name of YOUR VM!
Finally, the guide assumes that you have supergfxctl installed and configured correctly and are currently on integrated graphics mode as the starting point:
supergfxctl -m integrated
** Note for Asus Rog Flow X13 users - The dGPU on the Flow X13 is not wired to any external port, so you will have to use Using Looking Glass with a Virtual Display Driver to have a working dGPU pass-through. You will also need Supergfxctl v5.0.0 or newer for vfio mode switching support.**
Contents
- Introduction
- VM Creation Walkthrough
- Looking Glass Setup
- Adding The IVSHMEM Device To The VM
- Creating The IVSHMEM Block On The Host
- Installing The IVSHMEM Windows Driver
- Installing The Host Application (Windows)
- Building The Looking Glass Client (Linux)
- Using Looking Glass with a Dummy Display Plug
- Using Looking Glass with a Virtual Display Driver
- Disable GNOME Screen Dimming (EvDev Only)
- Looking Glass Kill Script (Optional)
- Performance Tweaking
- Looking Glass Performance Tweaks
- One-Click Launcher
Introduction
In this guide, I'll take you through the steps needed to have a working VM with GPU Passthrough. We'll also go over tweaks/settings to get the best performance possible, and I'll explain the reasons behind these chocies. This will give you a proper understanding of why I've made these choices, as well as whether something different might work better for you.
We'll also go over Looking Glass! Our notebooks all have extremely capable iGPU's, so we can make the experience even better by using our notebook's built-in display for our VM.
Plus, I'll show you how to wrap it all up with a pretty bow. That is to say, I'll walk you through setting up libvirt hooks, so we can automatically apply our performance tweaks, as well as start our VM and related tools - all with a single click.
I've provided some example files below for you. You can refer to these when you are creating the files and going through the steps:
If at any point you get stuck or have any questions, don't hesitate to visit the #virtualisation channel on Discord and ping me! I'm always happy to help if I can!
Cheers!
Bloodlvst
Why A Windows VM?
The main reason for using this type of setup is simply because I was tired of dual-booting. In my group of friends, I'm the only daily Linux user, and I was getting bored of constantly having to hope a new game worked properly with Wine/Proton and if not, make my friends wait even longer while I redownloaded and installed it after booting into windows. I also make occasional use of software such as Adobe CC which currently is a huge hassle to get functioning properly on Linux.
With the ROG Zephyrus line of notebooks, we have a powerful dGPU, as well as tons of CPU cores to make GPU passthrough on a VM a very attractive option. Couple that with Fluke's incredible work with supergfxctl, and we have a recipe for VFIO success!
Using a VM like this isn't for everyone, but if you're sick of dual-booting solely in order to play a couple of specific games, giving this a try may be worth it for you!
SELinux Considerations
If you're on Fedora, then your system uses SELinux. This improves security, but some of the steps in this guide will give you errors. Open the file /etc/libvirt/qemu.conf and find this line:
#security_default_confined = 1
Uncomment the line and change the value to 0. Note that while this does technically lower security, as long as this is your only VM and you aren't doing risky or otherwise sketchy things with it, you should be fine. To further ease your concern, keep in mind that Arch users do not have SELinux and run VM's with no issues.
XML Editing
You will often need to edit your VM's XML configuration file. I prefer to simply use the virt-manager GUI for this. To enable XML editing in the GUI, go to the main virt-manager window, and click Edit > Preferences. In this window, ensure the "Enable XML Editing" is selected:

VM Creation Walkthrough
Chapter 1: Prerequisites
Let's make sure we have everything we need.
Packages
First, install the necessary packages required to create a VM with a UEFI BIOS:
NOTE: You only need to install the supporting qemu-kvm-core as we're mostly using libvirt.
# Fedora
sudo dnf install qemu-kvm-core libvirt virt-manager

# Arch
sudo pacman -S qemu libvirt edk2-ovmf virt-manager ebtables dnsmasq
After installation of the packages, it is strongly recommended to reboot to avoid any issues.
Confirm IOMMU Status
Now, we need to ensure IOMMU is enabled. It should be enabled by default in Fedora and Arch kernels. You can check this with the following command:
dmesg | grep -i -e DMAR -e IOMMU
If the command returns any results at all, then IOMMU is enabled in your system. If no results are returned, then you may need to enable IOMMU. Refer to your distribution's documentation on how to do this.
Enable Supergfxctl VFIO Mode
By default, supergfxctl doesn't allow us to set VFIO mode. It's easy to enable though! Open /etc/supergfxd.conf and find this line:
"gfx_vfio_enable": false,
Edit the file and change false to true and save the file. Then, restart the asusd service:
sudo systemctl restart supergfxd
You can now use supergfxctl's VFIO graphics mode!
IOMMU Groups & Device IDs
This part can really be done later on. However, if we just do it now, we'll already have a proper understanding of what we're looking for when the time comes to add the dGPU to our VM.
Go ahead and enable VFIO mode:
supergfxctl -m vfio
Now, copy and paste the below bash script into a terminal (if you're not using bash, save it into an executable script file and run it):
#!/bin/env bash
shopt -s nullglob
for g in `find /sys/kernel/iommu_groups/* -maxdepth 0 -type d | sort -V`; do
    echo "IOMMU Group ${g##*/}:"
    for d in $g/devices/*; do
        echo -e "\t$(lspci -nns ${d##*/})"
    done;
done;
After running this, the terminal will display a list of all your PCI devices, listed by their IOMMU group. Skim through the list until you find the IOMMU group that contains your dGPU. Here's what mine looks like:
IOMMU Group 10:
	01:00.0 VGA compatible controller [0300]: NVIDIA Corporation TU116M [GeForce GTX 1660 Ti Mobile] [10de:2191] (rev a1)
	01:00.1 Audio device [0403]: NVIDIA Corporation TU116 High Definition Audio Controller [10de:1aeb] (rev a1)
	01:00.2 USB controller [0c03]: NVIDIA Corporation TU116 USB 3.1 Host Controller [10de:1aec] (rev a1)
	01:00.3 Serial bus controller [0c80]: NVIDIA Corporation TU116 USB Type-C UCSI Controller [10de:1aed] (rev a1)
Don't worry if you see more or fewer devices in your group than what I've shown! We simply need to know which group our dGPU is in (and take note of the address IDs 01:00.0, 01:00.1, etc.).
The important part is to ensure that the IOMMU group containg our GPU contains only our GPU devices. This is because in order to pass through a PCI device to our VM, we need to pass through every device from the same group. In essence, the entire IOMMU group needs to be passed through.
To my knowledge, all ROG laptops version 2020 and newer should be configured with the dGPU in its own IOMMU group. If for any reason yours is not, don't worry, passthrough is still possible. However, it will require an ACS Override kernel patch, which is out of the scope of this guide. Come reach out on the Discord if this is the case for you, and we'll do our best to help!
Download Required ISO Files
You can't install Windows 10 without a Windows 10 ISO, so you'll need one of those. I will assume you know how to get your hands on one!
NOTE: This guide was written for Windows 10, so use Windows 10 for the most tested VM, however as of Feb 2023 Windows 11 appears to be working correctly also (though not tested it as thoroughly yet).
We will also need the VirtIO driver binaries. Fedora conveniently provides an ISO containing the drivers. You can download the drivers at either of the below links:
I recommend using the latest version of the driver ISO. In my experience they're just as stable, and they will contain all the latest improvements.
Required Hardware
- Your ROG laptop (duh)
- Either of the following (if you're not using the Virtual Display Driver):
- An external monitor with DisplayPort capability (along with a compatible USB-C DisplayPort cable)
- A USB-C dummy display adapter
- An 2nd installed M.2 NVMe drive (optional)
The dummy adapater is a requirement only if you want to set up and use Looking Glass without using the Virtual Display Driver. If you need to purchase one, I use this one and it works great.
Chapter 2: Libvirt Hooks
Libvirt hooks are probably the single most useful thing I've learned in my VM journey. Seriously! In my prior experience with GPU passthrough, I needed to permanently reserve things for the VM - even CPU cores! This isn't very convenient if we aren't using the VM and want use our machines to their full potential for other tasks.
If you want to learn more about libvirt hooks, The Passthrough Post has a fantastic article which explains it all. You can also check out libvirt's offical hook documentation. Don't worry, I'll still give you a high level overview of it!
It's possible to dynamically do things like reserve memory for hugepages, or isolate our CPU's after the system boots. The problem is if you're like me, you don't always remember to enter the commands to do it beforehand. Or more likely, you forget to set everything back to normal after you shutdown the VM.
So what are hooks? Hooks give us the capability to run commands/scripts when starting or shutting down our VM. No more needing to remember commands or running scripts that start the VM for you! With hooks, the scripts you assign to your VM will automatically get run every time you start or stop the VM.
Installing Hooks
The previously mentionied artiicle has a great hook helper tool, complete with instructions on how to install. We will be using slightly different instructions that are more relevant to my setup. I'm also hosting the hook helper tool on our site, just in case theirs happens to go down for whatever reason.
To install the hook helper, enter the below chained command:
sudo mkdir -p /etc/libvirt/hooks/qemu.d && sudo wget 'https://asus-linux.org/files/vfio/libvirt_hooks/qemu' -O /etc/libvirt/hooks/qemu && sudo chmod +x /etc/libvirt/hooks/qemu
This command does the following: creates the basic folders required to use hooks, downloads the hook helper to the correct folder, and marks the helper executable.
If you've already set up hooks, be aware that the above will overwrite them, so ensure you've backed them up if necessary!
The hook helper won't take effect until we restart the libvirt service, so let's do that now:
sudo systemctl restart libvirtd
From the Passthrough Post article, here are the hooks we're going to be using:
# Before a VM is started, before resources are allocated:
/etc/libvirt/hooks/qemu.d/$vmname/prepare/begin/*

# After a VM has shut down, before releasing its resources:
/etc/libvirt/hooks/qemu.d/$vmname/stopped/end/*

# After a VM has shut down, after resources are released:
/etc/libvirt/hooks/qemu.d/$vmname/release/end/*
When we put an executable script or file in any of these folders, the hook manager will take care of the rest. If we're using the default win10 (or win11) name for our VM, the directory structure should look like this (you can use command sudo tree /etc/libvirt/hooks/ if you want to check the directory's structure):
/etc/libvirt/hooks
├── qemu
└── qemu.d
    └── win10
        ├── prepare
        │   └── begin
        └── release
            └── end
Enter the below chained command to create the required directory structure. Ensure to replace win10 with what you plan to name your VM if required:
sudo mkdir /etc/libvirt/hooks/qemu.d/win10 && sudo mkdir -p /etc/libvirt/hooks/qemu.d/win10/prepare/begin && sudo mkdir -p /etc/libvirt/hooks/qemu.d/win10/release/end
Creating Your First Hook Scripts
With these folders created, we can now make our first scripts. The first script will actually just be a configuration file where we will store variables for our scripts when the time comes.
Create a file /etc/libvirt/hooks/qemu.d/win10/vm-vars.conf, and add the following content and save it:
## Win10 VM Script Parameters

# To modify GNOME settings to disable the screensaver, we
# need to specify the username and ID. As well, when the
# VM is turned off, we need to restore the amount of idle
# time until the screen is turned off (in seconds)
LOGGED_IN_USERNAME=kyle
LOGGED_IN_USERID=1000
GNOME_IDLE_DELAY=900

# How much memory we've assigned to the VM, in kibibytes
VM_MEMORY=8388608

# Set the governor to use when the VM is on, and which
# one we should return to once the VM is shut down
VM_ON_GOVERNOR=performance
VM_OFF_GOVERNOR=schedutil

# Set the powerprofiles ctl profile to performance when
# the VM is on, and power-saver when the VM is shut down
VM_ON_PWRPROFILE=performance
VM_OFF_PWRPROFILE=power-saver

# Set which CPU's to isolate, and your system's total
# CPU's. For example, an 8-core, 16-thread processor has
# 16 CPU's to the system, numbered 0-15. For a 6-core,
# 12-thread processor, 0-11. The SYS_TOTAL_CPUS variable
# should always reflect this.
#
# You can define these as a range, a list, or both. I've
# included some examples:
#
# EXAMPLE=0-3,8-11
# EXAMPLE=0,4,8,12
# EXAMPLE=0-3,8,11,12-15
VM_ISOLATED_CPUS=0-1
SYS_TOTAL_CPUS=0-15
That's it for this file for the time being. We'll revisit it later on.
The first scripts we will be creating are actually both the most simple, and most important scripts, as they'll set the supergfxctl graphics mode when we start and stop the VM. Create and save the two following files:
/etc/libvirt/hooks/qemu.d/win10/prepare/begin/10-asusd-vfio.sh:
#!/bin/bash

## Load VM variables
source "/etc/libvirt/hooks/qemu.d/win10/vm-vars.conf"

## Use supergfxctl to set graphics mode to vfio
echo "Setting graphics mode to VFIO..."
supergfxctl -m vfio

echo "Graphics mode set!"
sleep 1
/etc/libvirt/hooks/qemu.d/win10/release/end/40-asusd-integrated.sh:
#!/bin/bash

## Load VM variables
source "/etc/libvirt/hooks/qemu.d/win10/vm-vars.conf"

## Use supergfxctl to set graphics mode to vfio
echo "Resetting graphics mode back to integrated..."
supergfxctl -m integrated

echo "Graphics mode reset!"
sleep 1
Remember to make both of these files executable:
sudo chmod +x /etc/libvirt/hooks/qemu.d/win10/prepare/begin/10-asusd-vfio.sh
sudo chmod +x /etc/libvirt/hooks/qemu.d/win10/release/end/40-asusd-integrated.sh
Your hook directory should now look like this:
/etc/libvirt/hooks
├── qemu
└── qemu.d
    └── win10
        ├── prepare
        │   └── begin
        │       └── 10-asusd-vfio.sh
        ├── release
        │   └── end
        │       └── 40-asusd-integrated.sh
        └── vm-vars.conf
Congrats! You've created your first two hook scripts. Whenever we start our VM, libvirt will automatically use supergfxctl to set our graphics mode to VFIO before starting the VM, then restore it to integrated after we shut it down.
We'll create more hooks later on when we optimise our VM's performance.
Chapter 3: Creating Our VM
Before we get started, we should add our user account to the libvirt group. If we don't do this, then every time we open virt-manager we will be prompted for authorisation. This, in my opinion, is annoying (plus, it ruins our final goal of a single-click solution).
We'll also take this opportunity to add ourselves to the kvm group, as it will be required for future steps.
To add ourselves to these groups:
sudo usermod -aG libvirt,kvm user
Additionally, ensure that supergfxctl is set to vfio mode before we begin creating the VM, or else we won't be able to add our dGPU:
supergfxctl -m vfio
Alright, I know you're excited, so let's stop teasing and jump into it!
Step 1
Open up virt-manager and click the icon in the top left of the window to create a new VM:
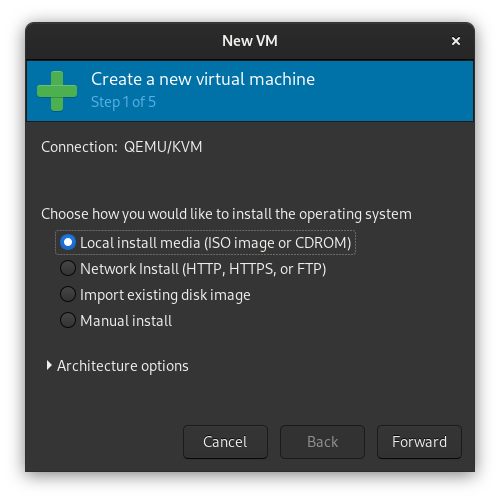
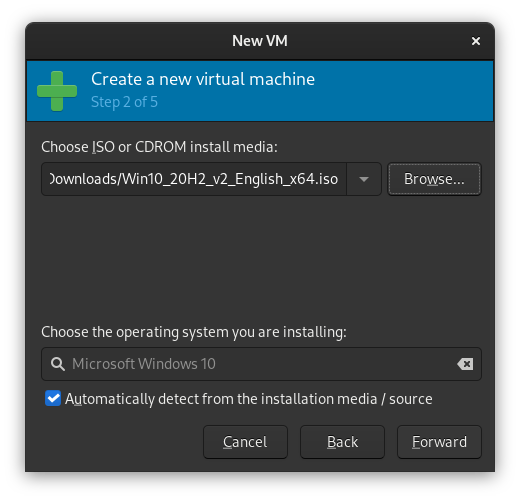
Step 2
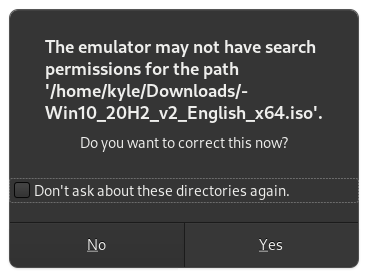
Choose the Local install media option, then click "Browse" on the next window. You'll get a pop-up. Click "Browse Local" and navigate to the location of your Windows install ISO.
If you get the below warning, just click "Yes".
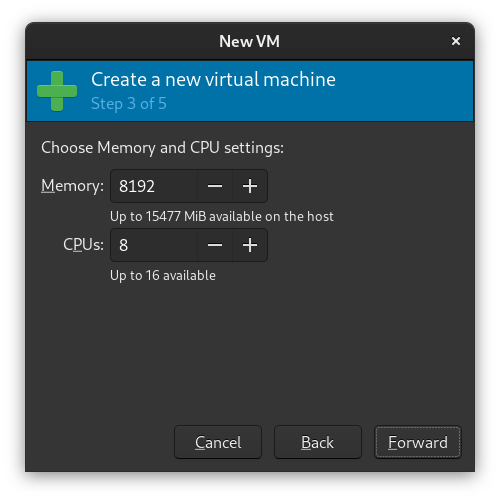
Step 3
Next, configure some RAM and CPUs for your VM. On an 8-core multithreaded CPU with 16 GiB of RAM, I recommend choosing at least 8 CPU's and 8 GiB of RAM, but feel free to modify this to your needs.
Note that on this screen 8 CPUs means 8 threads.
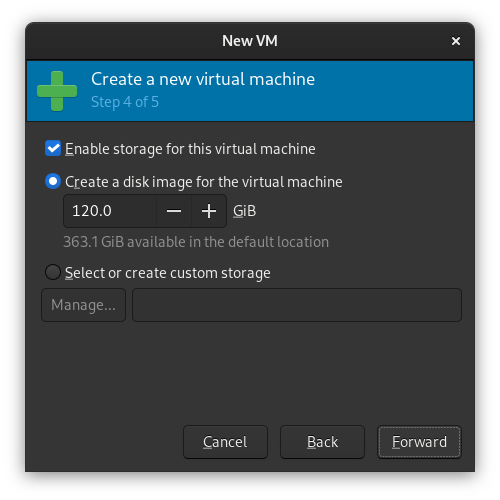
Step 4
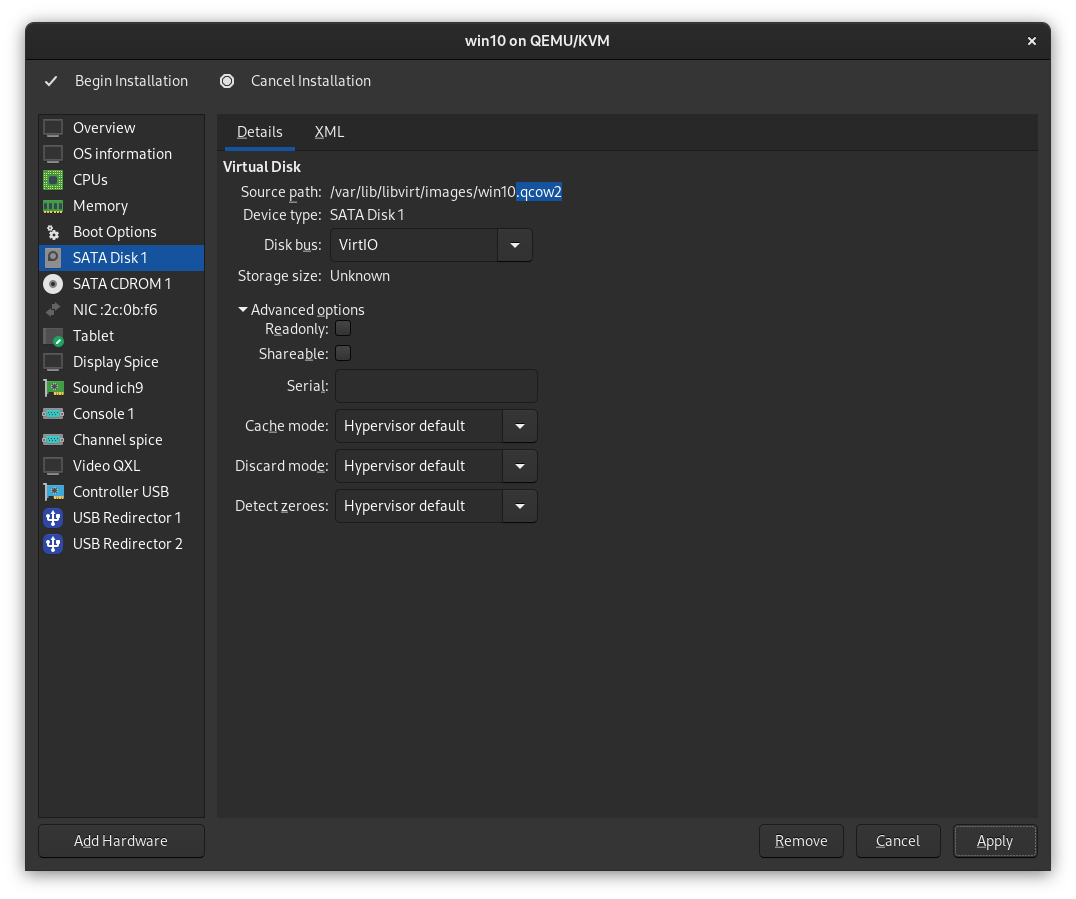
You'll now be asked to set up storage for your VM. Set a size that will accomodate the games or software you plan to use with your Windows install.
By default, the .qcow2 image created by libvirt will be stored in /var/lib/libvirt/images/win10.qcow2. If you have an existing disk or want to use a different format, choose the Select or create custom storage option.
Alternate Process
If your laptop model supports installation of an additional NVMe drive, you may wish to pass through the entire drive itself instead of using a virtual disk, for increased performance. My G15 has this, and it's what I've preferred in the past. However, note that I am currently using a virtual disk on my VM and I've noticed no real-world performance difference (of course, YMMV).
Before proceeding with this, install the NVMe drive into your system and ensure that it is in its own IOMMU group. (Refer to Chapter 1 if you forget how). Most ROG boards are similar, and I can confirm on my GA502IU the NVMe devices have their own IOMMU groups as shown below:
IOMMU - Group 13:
	04:00.0 Non-Volatile memory controller [0108]: Samsung Electronics Co Ltd Device [144d:a809]
IOMMU - Group 14:
	05:00.0 Non-Volatile memory controller [0108]: Micron Technology Inc Device [1344:5410] (rev 01)
If your NVMe device is in its own IOMMU group, you're all set! Untick the Enable storage for this virtual machine checkbox, and continue through the rest of the guide steps as normal. There will be a note for those of you doing this once we reach that section!
Step 5
In the final step, review your selected settings, and ensure you have selected the Customize configuration before installation checkbox, then click "Finish".
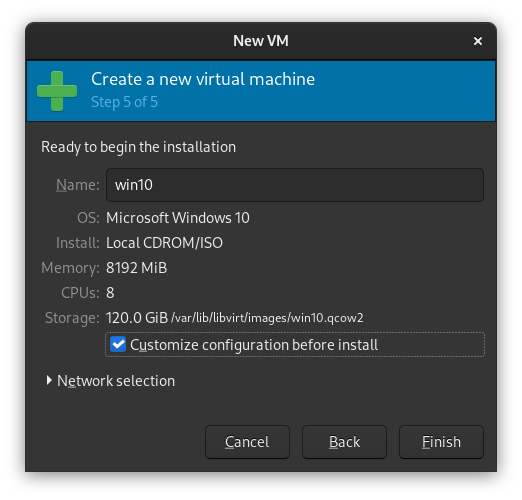
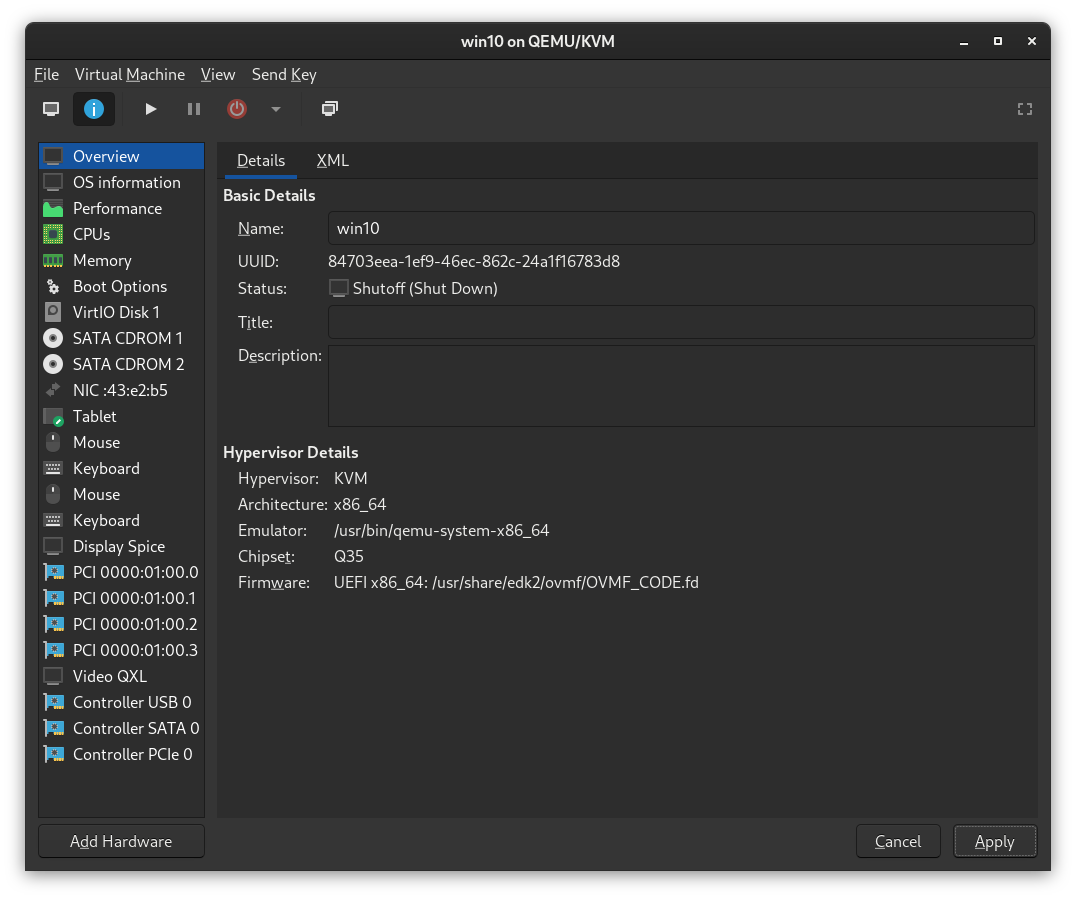
You'll now see a new window with some more advanced configuration options. You can edit the libvirt XML file, or you can use the GUI to modify these settings. For now, we only need to change some basic things, so we'll use the GUI.
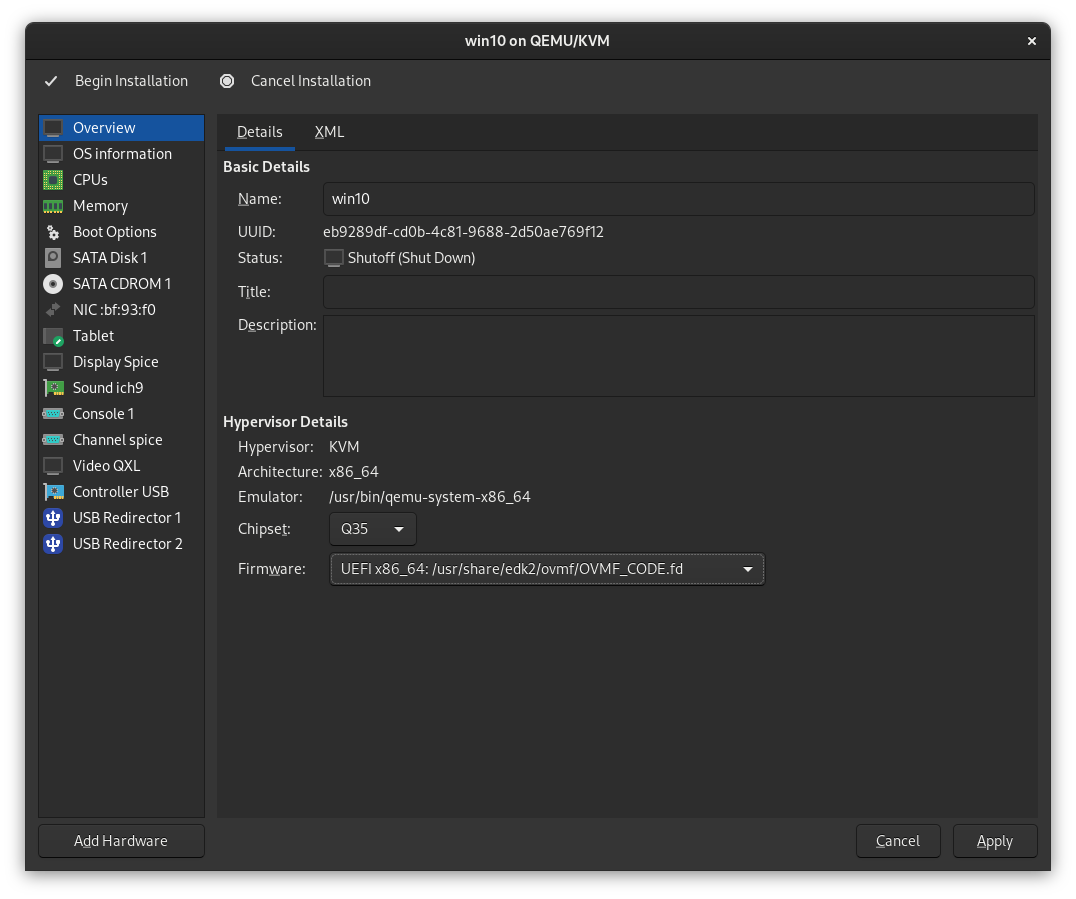
Step 6
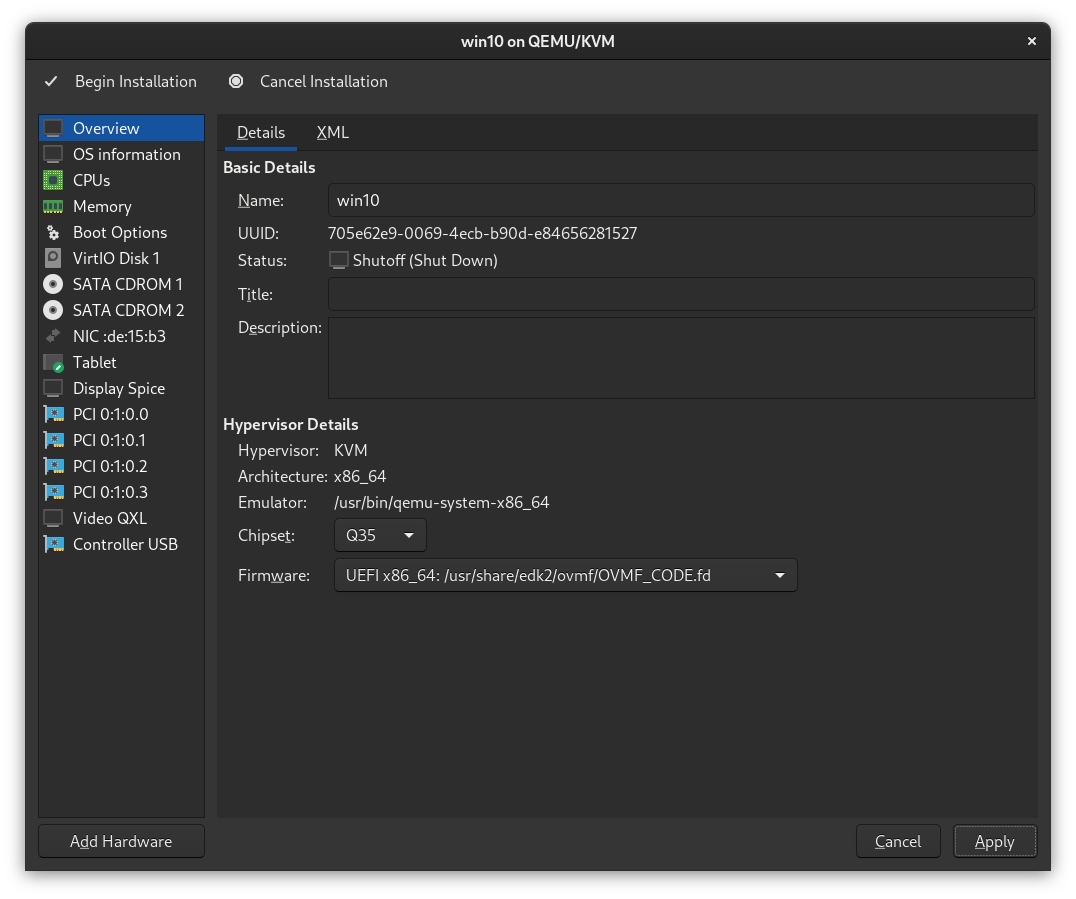
In the "Overview" section, ensure the firmware dropdown is set to UEFI x86_64: /usr/share/OVMF/OVMF_CODE.fd and click Apply.
If you are installing Windows 11, select UEFI x86_64: /usr/share/OVMF/OVMF_CODE.secboot.fd instead.
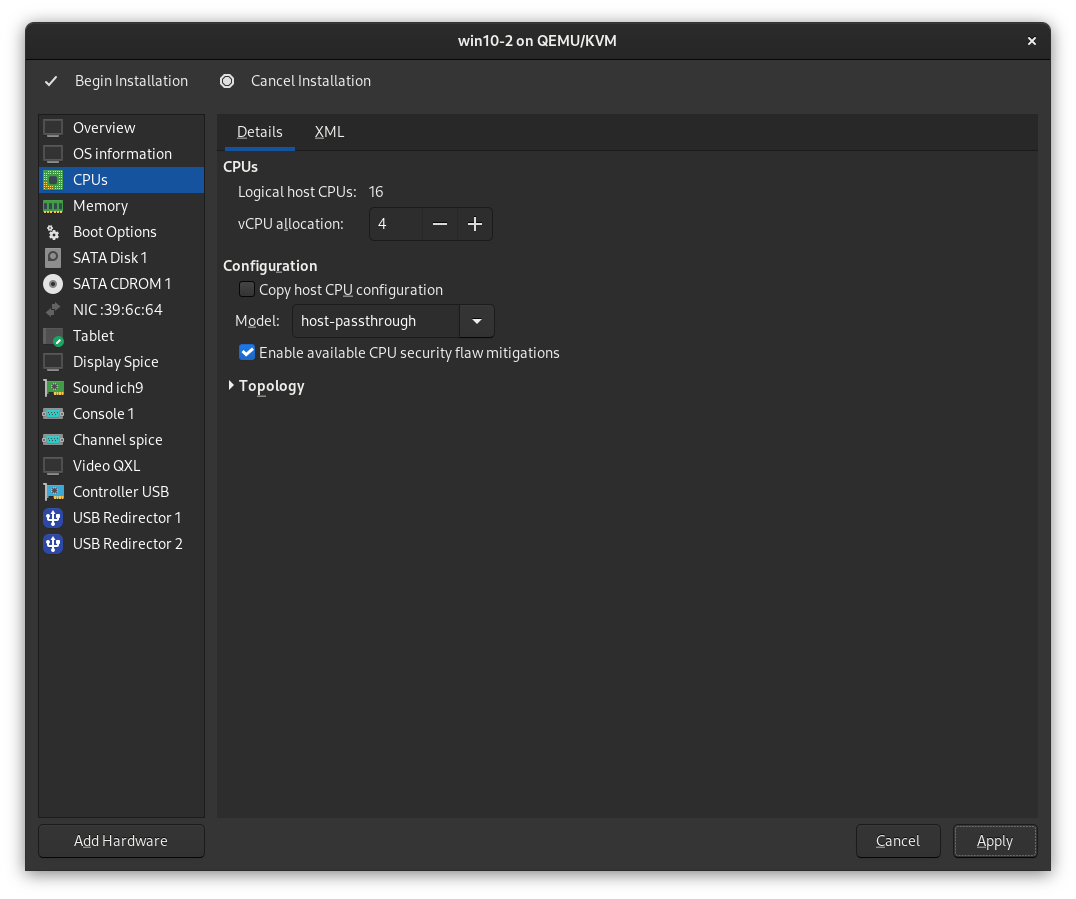
Step 7
Next, in the CPUs section, remove the checkmark next to Copy host CPU configuration, and select host-passthrough from the Model dropdown.
Also ensure Enable available CPU security flaw mitigations is checked to ensure your VM is still protected from any Spectre/Meltdown CPU vulnerabilities and then click Apply. You'll notice that the checkmark goes away - don't worry about this, it's a known issue with libvirt.
Step 8
If you are passing through an NVMe drive, skip this step and refer to the "Alternate Version" of Step 8.
In SATA Disk 1, we will want to change it to a VirtIO disk for improved performance. Change Disk Bus to VirtIO, then click Apply.
Note: You may research the various cache, discard, and detect zeroes modes on your own and choose the that best suits your needs. I will not make any recommendation, as this is a contentious topic at best.
Next, select Boot Options from the menu and ensure you've set your NVMe device as a boot device (the Windows ISO should still be the first priority device):
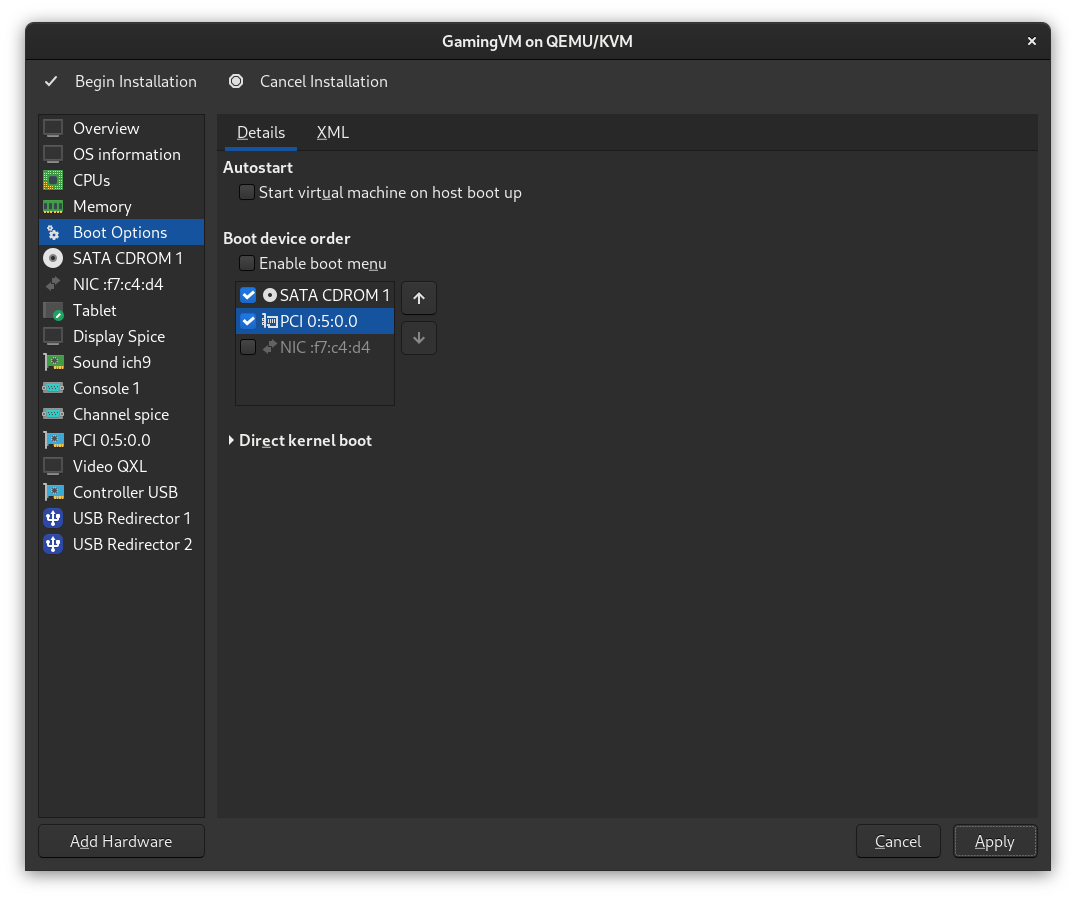
Make sure to click Apply, and that's it! You can now continue with the rest of the steps.
Step 8 (Alternate Version)
If you aren't passing through an entire NVMe SSD to your VM and already completed Step 8, skip ahead to Step 9.
If your laptop model comes with an open M.2 slot to install a 2nd NVMe drive, this is one of the simplest and easiest performance improvements you can make.
Virtual hard disks have some extra overhead, and they're shared with the host. While virtual drive performance should still be acceptable, by passing through an entire NVMe drive, we can get native drive performance, and not need to install any extra drivers.
To pass through our NVMe device, click "Add Hardware" in the bottom left, then select "PCI Host Device". In the list of devices that appears, find the NVMe device you wish to pass through:
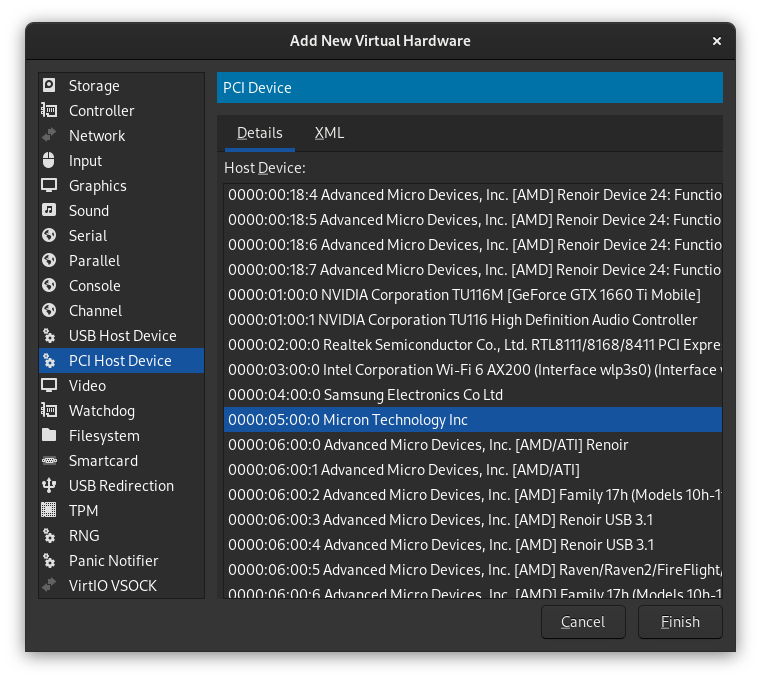
In my case, the Samsung drive is my boot drive, so I'll select the Micron drive and then click Finish.
Next, select Boot Options from the menu and ensure you've set your NVMe device as a boot device (the Windows ISO should still be the first priority device):
Make sure to click Apply, and that's it! You can now continue with the rest of the steps.
Step 9
If you've passed through an NVMe device, this step still applies to you, as we will need these drivers for our VM's network card!
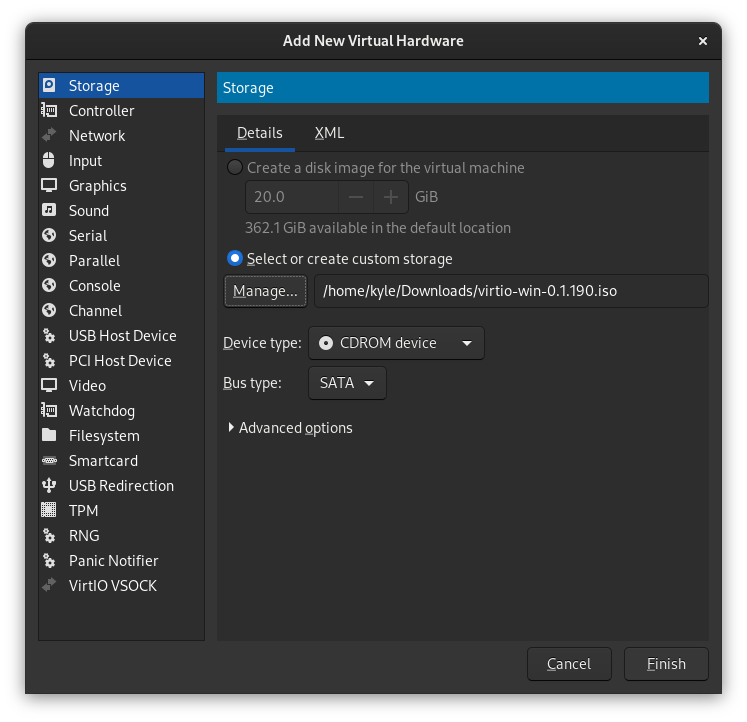
Because Windows does not include drivers for any VirtIO devices, the Windows installation wizard won't detect your VirtIO disk. We'll need to mount a 2nd virtual CDROM device with the VirtIO driver ISO.
Click the "Add Hardware" button in the bottom left, choose "Storage" from the list, and set "Device type" to CDROM device. Then click "Manage" and browse to your driver ISO.
Step 10
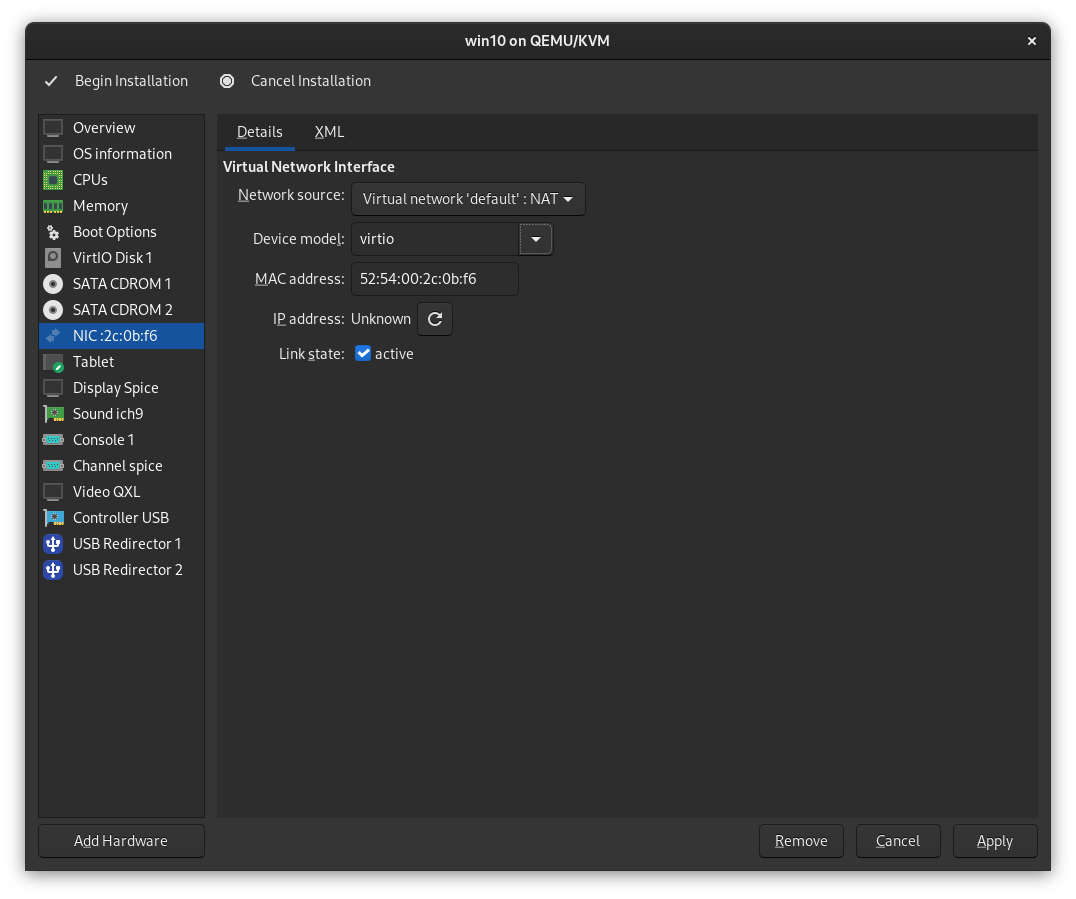
We also want to set our NIC device to use the VirtIO drivers for improved performance and less overhead. Click the "Device model" dropdown and change it to virtio, and click Apply.
Step 11
It's time to add our dGPU to the VM! Click the Add Hardware button in the bottom left, and then select PCI Host Device. You'll be shown a list of devices. Select the first device belonging to our dGPU and click Finish.
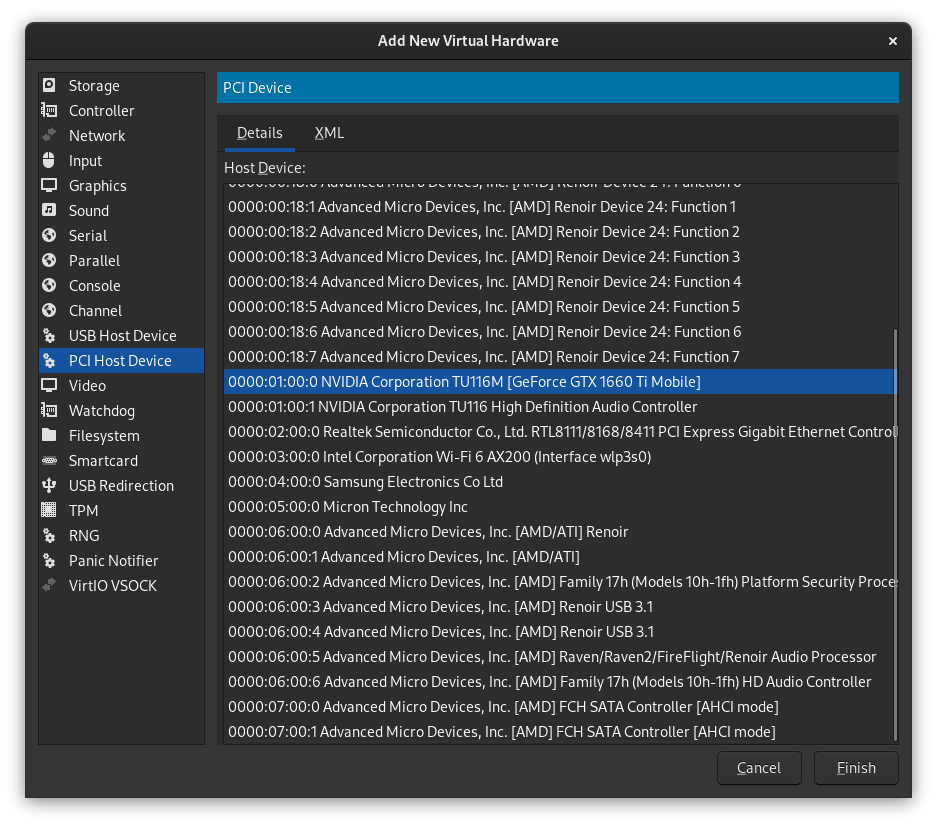
Repeat this process for all the devices in your dGPU's IOMMU group.
You might've noticed that in my case, even though I had 4 devices in my dGPU's IOMMU group, only the first 2 show up in the list of devices to choose from. If you don't have this issue and all of your devices are available to select, finish adding them all and skip ahead to Step 12.
However, if you do have this issue the fix is pretty simple. For whatever reason, in older versions of libvirt, I've noticed that if the supergfxctl graphics mode is changed to vfio without restarting the libvirt service, some of the devices in the dGPU's IOMMU group will be missing on this screen.
Cancel the creation of the VM, and restart the libvirt service:
sudo systemctl restart libvirtd
After doing this, you'll need to restart the VM creation process from Step 1. When you get back to this step, you should see all of the devices present from your dGPU's IOMMU group. Add them all and proceed to the next step.
Step 12
At this point, we can go ahead and remove all the extra devices libvirt adds which we won't be using. The devices I remove are:
- Sound ich9
- Console 1
- Channel Spice (if you are planning to use Looking Glass, leave this installed)
- Both USB Redirectors
One you're done, it should look like the image below:
Step 13
At this point, we can finally click "Begin Installation" to begin installing our VM! The Windows install is just your normal Windows install...with a couple of caveats.
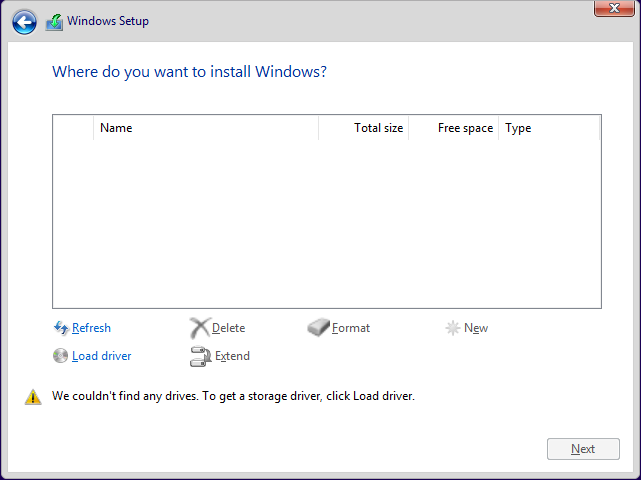
If you are using a VirtIO disk, you'll be greeted with the below screen, instead of the expected list of drives to install onto. Remember, Windows doesn't include drivers for VirtIO devices, so we need to load the drivers before we can install Windows. Click the "Load driver" link in the bottom left.
Note: If you passed through an NVMe drive, your drive will show up normally on this screen. There's no need for you to install the VirtIO disk driver, just ensure to read the rest of this step and install the VirtIO network driver!
Your drive letter may be different, but based on the below screenshot, navigate to E:\viostor\w10\amd64\, and click OK to install the disk driver. You'll see you now have a disk to install Windows onto:
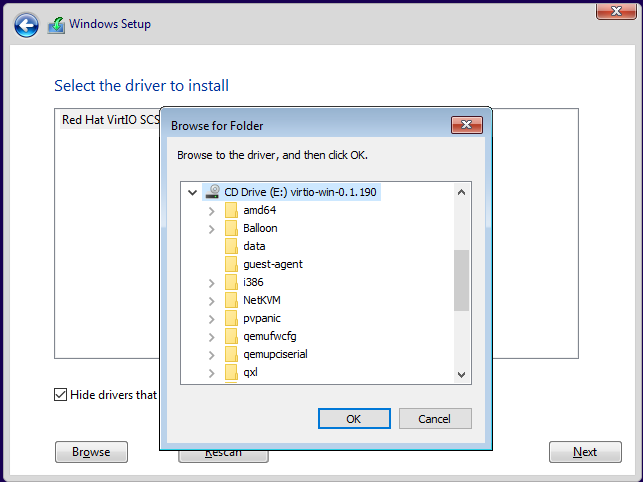
While we're here, we can also load the driver for our Virtio network adapter. We won't be able to access the Internet without this. Repeat "Load driver" process, and select the E:\NetKVM\w10\amd64\ folder.
From this point, continue installing Windows as normal with your preferred settings, though I do recommend to use an Offline account if your version of Windows allows this.
NOTE: If you are installing Windows 11 there is no option to select Offline account, however you can still use one. At the Select keyboard screen, press Shift + F10 and a Command Prompt will appear, and you will be in the C:\Windows\System32\ folder. Type oobe\bypassnro (this is referring to a command in the C:\Windows\System32\oobe\ folder, and is not a mistyped command switch). The VM will restart, and once it has you will have the option to select an offline account.
Once installation is finished, boot the VM into Windows install any needed Windows updates. Unless you actually need it for something, I also recommend uninstalling OneDrive.
After you've installed your Windows updates, from inside your VM go to the Nvidia site and download the latest Windows drivers for your card. Nvidia recently released an update to their Windows drivers, which fixes a bug that caused the GPU to trigger the infamous Code 43 Error when the GPU was running inside of a VM.
There are several guides out there on workarounds for this, but don't bother with them. They're 100% obsolete as long as you are using current drivers!
We're Special, So We Still Get To Experience Code 43
Unfortunately, some of you will still get a Code 43 error after you update the drivers and reboot, especially those of you with Max-Q cards. The reason for this is because your dGPU knows it's a mobile GPU, so it looks for the existence of a battery in the system. If it doesn't find one, it doesn't load the driver.
Thankfully, we can correct this by adding a fake battery to the VM. Open your VM's XML config. You should see the following in the first line of your XML:
<domain type="kvm">
Replace that line with the below:
<domain xmlns:qemu="http://libvirt.org/schemas/domain/qemu/1.0" type="kvm">
Now, scroll to the bottom of the XML. Right before </domain>, paste the following above it so it looks like the below:
<domain xmlns:qemu="http://libvirt.org/schemas/domain/qemu/1.0" type="kvm">
...
  <qemu:commandline>
    <qemu:arg value="-acpitable"/>
    <qemu:arg value="file=/var/lib/libvirt/images/acpitable.bin"/>
  </qemu:commandline>
</domain>
Next, we need to actually copy the fake battery table file to the above folder. Download the fake battery file here. Open a terminal in the folder you saved it to, and enter the following command to copy it to the correct location:
sudo cp acpitable.bin /var/lib/libvirt/images/
Lastly, we can insert the motherboard SMBIOS data which will hopefully prevent having to reactivate Windows. Extract hardware UUID and serial from the BIOS by typing:
sudo dmidecode -t 0
sudo dmidecode -t 1
And add the details into the bottom of the XML under acpitable.
NOTE: If your BIOS strings contain a comma (",") leave it out, as it will mess up the comma separated values in the XML. E.g. American Megatrends International, LLC. will become American Megatrends International LLC.
<domain xmlns:qemu="http://libvirt.org/schemas/domain/qemu/1.0" type="kvm">
...
  <qemu:commandline>
    ...
    <qemu:arg value="-smbios"/>
    <qemu:arg value="type=0,vendor=American Megatrends International LLC.,version=GA402RJ.315,date=09/21/2022,release=5.24"/>
    <qemu:arg value="-smbios"/>
    <qemu:arg value="type=1,manufacturer=ASUSTeK COMPUTER INC.,product=ROG Zephyrus G14 GA402RJ_GA402RJ,serial=insertyours,uuid=insertyours,family=ROG Zephyrus G14"/>
  </qemu:commandline>
</domain>
Click Apply, and restart the VM. The code 43 error should now be gone, and your dGPU fully functional! Congrats, you have a basic VM working with GPU passthrough!
Before we get into Looking Glass or performance tweaking, make sure you read the next section regarding input devices, we'll of course need working input to actually use our VM!
Chapter 4: Configuring Input Devices
Before we go any further, we should talk about input devices. There are many options we have available for this. I'm going to go over the only 3 I would personally recommend if you plan on using the VM for gaming.
Touchpads...Eugh.
I wish I had good news here, but it seems there is no way to use the laptop's built-in touchpad with the first two options below. I'll spare the technical details, but one simply isn't possible, and one stops working shortly after the VM is booted.
If you really need your touchpad inside the VM, using Spice will be the only option that I cover in this guide. There are other solutions like Barrier or Synergy, but I won't be covering those in the guide. However, feel free to ask us in the #virtualisation channel on Discord and we will help as best we can!
Option 1: Direct USB Passthrough
PSA: You cannot directly pass through the built-in laptop keyboard. I've tried. No bueno. Bad times were had by all. Complain to me about this on Discord and I'll bitchslap you back to last Tuesday. So please, just don't. :)
This is the simplest option of all. Plug a USB mouse and keyboard into your laptop. Add the USB devices to your VM. Done.
Yes, it's really that easy. Just plug them in, then open your VM's configuration and click the "Add Hardware" button in the bottom left. On the next screen, select your keyboard, and click Finish. Then repeat the process for your mouse. That's it! Once you start your VM, it will take control of your passed through mouse/keyboard to be used inside the VM.
Note: Any devices you add MUST be connected before you start the VM, otherwise it will not start.
Option 2: EvDev Input
This one is actually my preferred method. It takes more effort to set up, but once you have it set up it's super convenient. Plus it works with both Looking Glass or an external display, so you don't need to drag a keyboard around to use your VM on the go!
First, you'll want to find the ID's for your input devices. Enter the following command into a terminal:
ls /dev/input/by-id/
You should get output similar to the below:
usb-ASUSTeK_Computer_Inc._N-KEY_Device-event-if02
usb-ASUSTeK_Computer_Inc._N-KEY_Device-event-kbd
usb-ASUSTeK_Computer_Inc._N-KEY_Device-if01-event-kbd
usb-Logitech_USB_Receiver-if02-event-mouse
usb-Logitech_USB_Receiver-if02-mouse
To figure out which ones to pass through, use the following command for each device:
cat /dev/input/by-id/DEVICE_NAME
After you enter the command, type some stuff or move the mouse around. If you get a bunch of weird gibberish when typing/moving the mouse, you know you've got the right one.
Now, open your VM's config XML, and scroll down to </qemu:commandline>. You should see where we entered the fake battery stuff. Edit this section so it looks like this:
  ...
  <qemu:commandline>
    <qemu:arg value="-acpitable"/>
    <qemu:arg value="file=/var/lib/libvirt/images/acpitable.bin"/>
    <qemu:arg value="-object"/>
    <qemu:arg value="input-linux,id=mouse1,evdev=/dev/input/by-id/MOUSE_NAME"/>
    <qemu:arg value="-object"/>
    <qemu:arg value="input-linux,id=kbd1,evdev=/dev/input/by-id/KEYBOARD_NAME,grab_all=on,repeat=on"/>
  </qemu:commandline>
</domain>
Replace the MOUSE_NAME and KEYBOARD_NAME with whatever yours are. You'll notice each device has a pair of lines associated with it - one contains -object, then a second one with input-linux. If you're like me, and like to pass through your USB mouse directly to the VM, you can remove the pair of lines for your mouse. When you do this, only your keyboard will be attached to EvDev.
Using EvDev also requires our user to be a member of the input group or the VM will error out on start, so let's add that now:
sudo usermod -aG input user
Before we start the VM, we next need to edit /etc/libvirt/qemu.conf. Open the file, and find the following two lines.
#user = "root"
...
#group = "root"
Uncomment each line. For the user line, change root to your username. For the group line, change root to kvm.
Scroll down a little further, until you find the below block of text:
#cgroup_device_acl = [
#    "/dev/null", "/dev/full", "/dev/zero",
#    "/dev/random", "/dev/urandom",
#    "/dev/ptmx", "/dev/kvm"
#]
Uncomment it and replace with the following:
cgroup_device_acl = [
    "/dev/input/by-id/KEYBOARD_NAME",
    "/dev/input/by-id/MOUSE_NAME",
    "/dev/null", "/dev/full", "/dev/zero",
    "/dev/random", "/dev/urandom", "/dev/ptmx",
    "/dev/kvm", "/dev/rtc", "/dev/hpet"
]
Replace KEYBOARD_NAME and MOUSE_NAME with your devices. Remove the entry containing MOUSE_NAME from the array if you want to use only the keyboard with EvDev.
Once this is done, restart the libvirtd service:
sudo systemctl restart libvirtd
Start your VM. Control of your mouse/keyboard will be given directly to the VM. You can toggle control back and forth between the host and the VM by pressing both L-Ctrl and R-Ctrl at the same time. Once you shutdown the VM, control will be permanently given back to the host.
A few users have reported some strange issues when using EvDev, but thankfully these are corrected by using VirtIO keyboard/mouse drivers. To use these, we first need to edit our XML. Open your VM's configuration and find these two lines:
    <input type="keyboard" bus="ps2"/>
    <input type="mouse" bus="ps2"/>
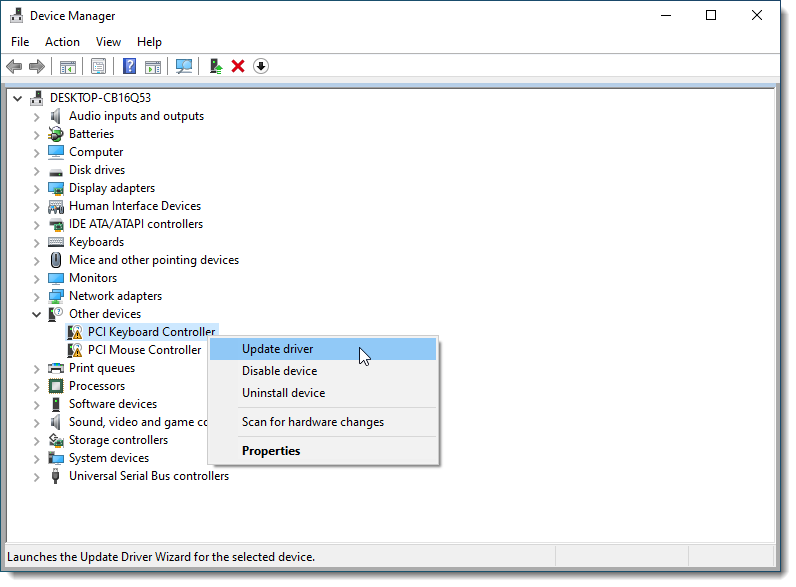
In both of them, replace ps2 with virtio, and click Apply. You should see additional entries for keyboard and mouse in the device list on the left. Start your VM back up. Once you log into Windows, click the Start menu and open Device Manager. You'll see the two VirtIO input devices as PCI Keyboard/Mouse Controller. For each of them, right-click the device and select Update driver:
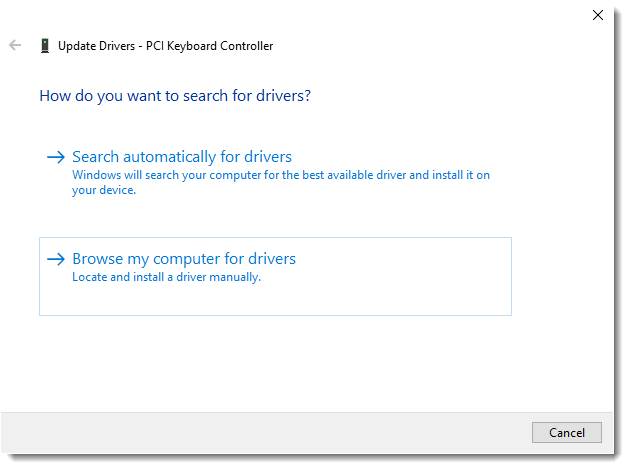
On the next screen, choose Browse my computer for drivers:
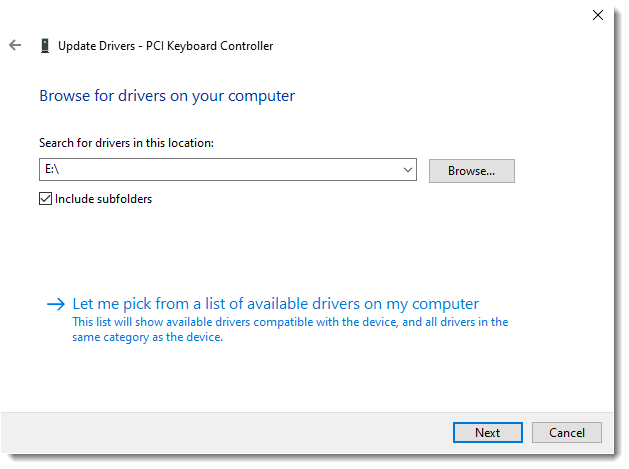
Ensure the Include subfolders checkbox is ticked, and click the Broswse button and select the drive where your VirtIO ISO is mounted. Once selected, click OK, and then Next:
You will see the message below if the driver has installed correctly:
Ensure you repeat the process for the other input device!
Option 3: Using Spice (Looking Glass Only)
If you are planning on using Looking Glass, you can skip straight to Chapter 5 Option 3.
Because this method requires using a Spice client on your system, I only recommend it when using Looking Glass. Looking Glass includes a Spice client which we can use for keyboard/mouse input if you do not want to use either of the previous 2 options.
If you're going to use this option, there's no other changes to make right now (even for you touchpad users). Any specific changes will be covered in the Looking Glass section.
Chapter 5: Configuring Audio
Option 1: QEMU JACK Backend with Pipewire
Until recently, a popular method was to use solutions such as Scream to use audio inside your VM. However, in my expierence there were sometimes delay and/or quality issues. And most importantly, it was playback only - I couldn't use my microphone to chat with my friends! The good news is that QEMU now has JACK backend support! In layman's terms, this means that we can use Pipewire to emulate JACK and share audio devices (both output AND input) with our VM. This solution may not be for everyone, depending on your specific configuration. I find I get some static/distortion when I first start the VM, especially if the Linux host has a high load. But for the most part after a minute or two my audio sounds great, and my friends have not noticed any issues hearing me on voice chat.
The first thing to do is to ensure you are running the VM under your user account. If you already set up EvDev then you won't need to do this step. However, if you didn't do this, it's simple to change. Open /etc/libvirt/qemu.conf in your text editor, and find the following two lines:
#user = "root"
...
#group = "root"
Uncomment each line. For the user line, change root to your username. For the group line, change root to kvm. Then, save the file.
Next, select Overview in the device list, and click the XML tab. Scroll down until you find the line that says </devices> and edit it so you have the following:
  <devices>
    ...
    <audio id="1" type="jack">
      <input clientName="win10" connectPorts="input-name"/>
      <output clientName="win10" connectPorts="output-name"/>
    </audio>
    <sound model="ich9">
      <alias name="sound0"/>
    </sound>
  </devices>
The value of clientName should reflect the name of your VM. If you used something other than the default win10 name, ensure to use it here as well. The values input-name and output-name should be replaced with a regular expression that matches the name of the input and output ports as they're listed in JACK. On Fedora, the utility to list devices isn't installed by default, so install it with the following command:
sudo dnf install jack-audio-connection-kit-example-clients
Now, you can use the command jack_lsp to list your JACK devices. You'll get an output similar to this:
G430 Surround Sound Gaming Headset Mono:capture_MONO
Family 17h (Models 10h-1fh) HD Audio Controller Analog Stereo:capture_FL
Family 17h (Models 10h-1fh) HD Audio Controller Analog Stereo:capture_FR
G430 Surround Sound Gaming Headset Digital Stereo (IEC958):playback_FL
G430 Surround Sound Gaming Headset Digital Stereo (IEC958) Monitor:monitor_FL
G430 Surround Sound Gaming Headset Digital Stereo (IEC958):playback_FR
G430 Surround Sound Gaming Headset Digital Stereo (IEC958) Monitor:monitor_FR
Family 17h (Models 10h-1fh) HD Audio Controller Analog Stereo:playback_FL
Family 17h (Models 10h-1fh) HD Audio Controller Analog Stereo Monitor:monitor_FL
Family 17h (Models 10h-1fh) HD Audio Controller Analog Stereo:playback_FR
Family 17h (Models 10h-1fh) HD Audio Controller Analog Stereo Monitor:monitor_FR
Renoir Radeon High Definition Audio Controller Digital Stereo (HDMI):playback_FL
Renoir Radeon High Definition Audio Controller Digital Stereo (HDMI) Monitor:monitor_FL
Renoir Radeon High Definition Audio Controller Digital Stereo (HDMI):playback_FR
Renoir Radeon High Definition Audio Controller Digital Stereo (HDMI) Monitor:monitor_FR
Midi-Bridge:Midi Through:(capture_0) Midi Through Port-0
Midi-Bridge:Midi Through:(playback_0) Midi Through Port-0
So for example, if I wanted to use my Logitech G430 Gaming Headset as my audio device, I would change the values to:
input-name - G430.*capture_MONO
output-name - G430.*playback_F[LR]
If you're unfamiliar with regex, you can use the site https://regex101.com/ to help. Paste your jack_lsp output into the test string area, and play around with various expressions until you get the matches you need. If you get stuck on this step, you can reach out to us in the #virtualisation channel on Discord!
Using the above example then, your XML would look like this:
  <devices>
    ...
    <audio id="1" type="jack">
      <input clientName="win10" connectPorts="G430.*capture_MONO"/>
      <output clientName="win10" connectPorts="G430.*playback_F[LR]"/>
    </audio>
    <sound model="ich9">
      <alias name="sound0"/>
    </sound>
  </devices>
The last step is to set the runtime directory and latency for Pipewire. Scroll down to </qemu:commandline>. You should see where we entered the fake battery stuff, along with other possible entries. Edit this section so it looks like this:
  ...
  <qemu:commandline>
    <qemu:arg value="-acpitable"/>
    <qemu:arg value="file=/var/lib/libvirt/images/acpitable.bin"/>
    ...
    <qemu:env name="PIPEWIRE_RUNTIME_DIR" value="/run/user/1000"/>
    <qemu:env name="PIPEWIRE_LATENCY" value="512/48000"/>
  </qemu:commandline>
</domain>
Ensure that 1000 is the same as your actual user ID. This should be true for the majority of users, but if you're unsure, you can use the command id -u user, replacing user with your login. The value 512/48000 represents the latency and sample rate, respectively. These defaults should be fine for most people, but feel free to test other values to see if they work better for you.
That's it! Shutdown your VM and restart it and you should hear your VM's audio through the configured device.
Option 2: Direct USB Passthrough
If you don't want to spend any time configuring Option 1, you can always simply connect a USB sound device and pass it through to the VM. This is the simplest and quickest way to get reliable audio in your VM.
However, in my experience I've noticed a few issues. The first is, at least on my system, every so often, the sound will cut out for a second or two. Nothing major, but it can be frustrating in certain situations. The other issue is that with this configuration, your VM will not start unless the USB audio device is connected, which can be inconvenient.
Compare this to using JACK with Pipewire with the laptop's built-in audio device. If nothing is connected, you'll have audio through the speakers. If you have a headset or headset/mic combo device plugged into the jack, you can plug and unplug on the fly without needing to restart.
The choice is up to you!
Option 3: Looking Glass Setup
Looking Glass is an amazing application which allows us to pass through our VM's display to the internal laptop display, while still keeping full image quality and extremely low latency. It does this by sharing the dGPU framebuffer over a block of shared memory between the VM and the host.
Adding The IVSHMEM Device To The VM
The first thing we need to do is add a shared memory block to the VM's configuration and create it on our host machine.
Ensure your host is shut down. Then, open your VM's XML and find the line that says </devices>, and edit it, so that it looks like the below:
  <devices>
    ...
    <shmem name="looking-glass">
      <model type="ivshmem-plain"/>
      <size unit="M">32</size>
    </shmem>
  </devices>
It's important to ensure that you set size of the shmem block accordingly. My device has a 1080p screen, which is why I chose 32 MiB. You can reference the below formula to determine your needs:
w * h * 4 * 2 = total bytes
total bytes / 1024 / 1024 = total MiB + 10
So for a 1080p screen it would look like this:
1920 * 1080 * 4 * 2 = 16,588,800
16,588,800 / 1024 / 1024 = 15.82 MiB + 10 = 25.82 MiB
In my case I get 25.82 MiB. The size of the block must be rounded up to the nearest power of 2, which would be 32.
Creating The IVSHMEM Block On The Host
With the above configuration, the VM will create the IVSHMEM block when we start the VM. However, the issue with this is that it doesn't create it with the right permissions so that we can use it with Looking Glass.
To correct this, we will use systemd-tmpfiles which will create the file at host boot with the proper permissions. Create the below file and save (remember to replace user with your username:
/etc/tmpfiles.d/10-looking-glass.conf:
#Type Path               Mode UID  GID Age Argument

f /dev/shm/looking-glass 0660 user kvm -
On reboot, systemd will create the file for you with the correct permissions. If you don't want to wait until next reboot, you can use this command to create the tmpfile instantly:
sudo systemd-tmpfiles --create /etc/tmpfiles.d/10-looking-glass.conf
Installing The IVSHMEM Windows Driver
Start your VM, and from inside it, go to the below address to download the IVSHMEM driver:
https://fedorapeople.org/groups/virt/virtio-win/direct-downloads/upstream-virtio/
On this page, ensure you download version 0.1-161 or later, earlier versions will not work. Extract the contents to a folder (at the time of writing virtio-win-08032022.zip is actually the most current version).
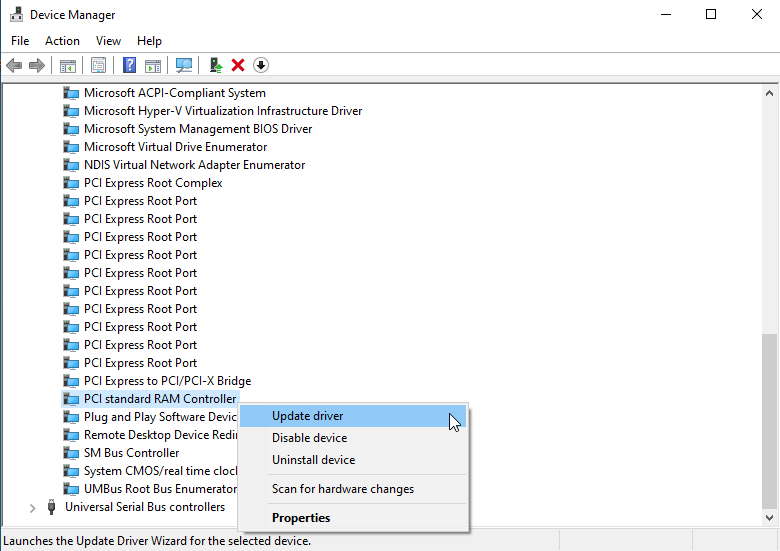
Click the Start menu and open Device Manager. Double-click System Devices, and scroll until you find PCI standard RAM Controller. Right-click this device and select Update driver:
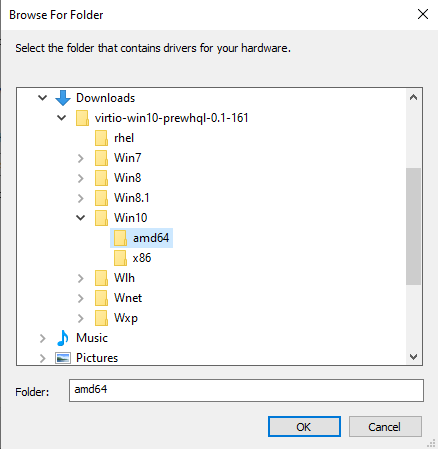
On the next screen, choose Browse my computer for drivers. Then, ensure the Include subfolders checkbox is ticked, and click Browse. Navigate to the folder you extracted the VirtIO upstream drivers to, select the Win10 folder shown below, click OK, and then Next.
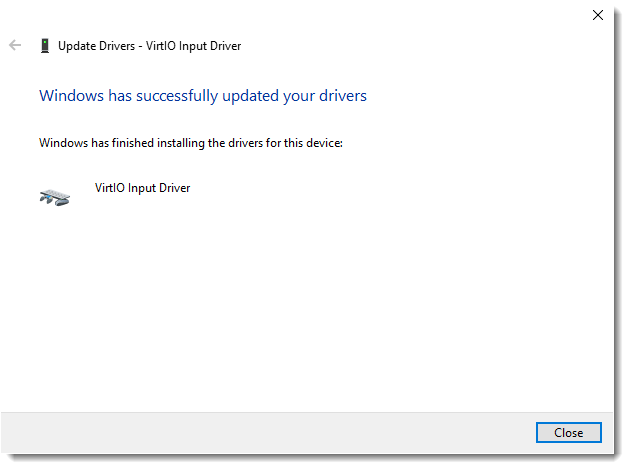
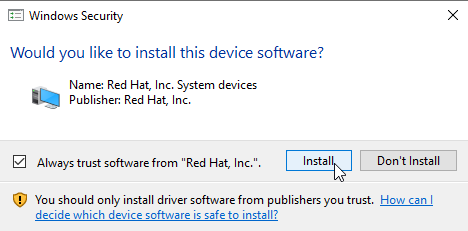
Windows should find a driver with the name Red Hat, Inc. System devices. Once it does, click "Install" to install it.
Windows should advise you that the IVSHMEM Device was installed. Close the window and device manager and proceed to the next step.
Installing The Host Application (Windows)
Now we can install the Windows part of Looking Glass, also known as the host application. Don't be confused by the name. Because the Windows VM is serving the frames to our Linux installation, it technically is the host in this case! Still from inside your VM, go to the Looking Glass downloads page.
NOTE: Despite the warnings, the B6 version of Looking Glass seem to be working well for people.
Now is a good time to note that you *must* use identical versions of the Windows Host Binary and the Linux Client. As of the writing of this guide, the stable version is version B5.0.1. You may use the bleeding edge build if you wish, but you'll be on your own and will need to reach out to the Looking Glass for support for any issues.
On the downloads page, click the link for Windows Host Binary and save the zip file to your VM, then extract the folder to your desired location. You may get an error when Windows tries to extract the build.log file. This is fine, just skip this file as it isn't needed. When you open the looking-glass-host-setup.exe file, you'll get a warning from Microsoft Defender:
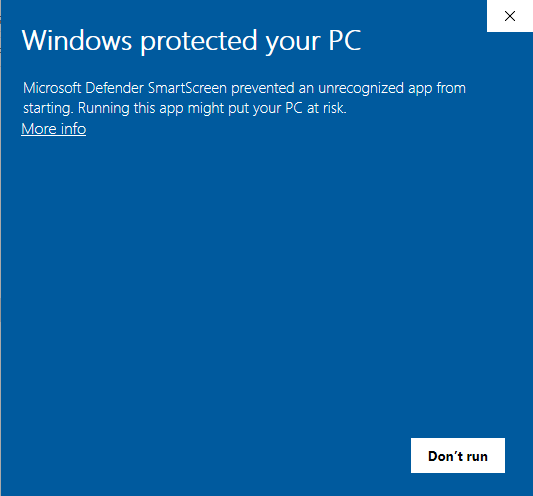
Simply click the "More Info" link, and then the "Run anyway" button. Follow the Looking Glass install wizard, and once it completes, close it and shut down the VM.
Building The Looking Glass Client (Linux)
Note: If you are using Arch, I highly recommend using the AUR packages for ease of installation. Due to this, the build dependencies listed below are specifically for Fedora users.
The final step now is to install the Looking Glass client on your Linux host. Fedora does not have any pre-built binary packages available for Looking Glass, so we will need to build our own client. Thankfully it's a fairly simple process!
First, ensure you have the appropriate build dependencies installed:
sudo dnf install binutils-devel cmake texlive-gnu-freefont fontconfig-devel SDL2-devel SDL2_ttf-devel spice-protocol libX11-devel nettle-devel wayland-protocols-devel gcc libXScrnSaver-devel libXfixes-devel libXi-devel wayland-devel libXinerama-devel libpng-static libxml2-devel libxkbcommon-devel libXcursor-devel libXpresent-devel pipewire-devel libsamplerate-devel libXrandr-devel
NOTE: If you've already set up Wine and various Wine dependencies on your system, you may get a warning saying libxml2-devel is already installed. This is because many guides for Wine install the 32-bit version of this by default. Looking Glass needs the 64-bit version and will give build errors if it's not installed. If this is the case for you, ensure you also install the 64-bit version by performing sudo dnf install libxml2-devel.x86_64.
Next, go to the Looking Glass Downloads page. This time, click the link for "Source" for your version of Looking Glass, ensuring it's the same as the Windows host binary you just downloaded. Extract the zip file to your desired location. In our case, we'll be simply extracting it to ~/looking-glass-source.
Open a terminal in your home folder, and enter the below command. This is a chained command that will navigate to your looking-glass-source folder, create the client build folder, enter it, run cmake, and then build Looking Glass for you:
cd ~/looking-glass-source && mkdir client/build && cd client/build && cmake ../ && make -j$(nproc)
While you're still in the build directory, type ls and you should see there is an executable file named looking-glass-client. For reference the full path to this file is ~/looking-glass-source/client/build/looking-glass-client.
You can run this file directly from the build folder, or you can move it to the /usr/local/bin/ directory in order to use the command globally from anywhere:
sudo cp ~/looking-glass-source/client/build/looking-glass-client /usr/local/bin/
_NOTE: If you do copy your looking-glass-client executable to /usr/local/bin/, ensure that any time you decide to update Looking Glass to a new version, that you also replace the version in /usr/local/bin/ with the newly built one. Also remember that if you update the Linux client, you will also need to update the Windows host application with the same version or Looking Glass will no longer work.
To avoid inconvenience, I recommend updating the Windows host version first. You'll lose your display, but Looking Glass will restart the service with the new version. The Looking Glass client builds very quickly, so once this is done, build the matching client version, then run the Looking Glass client. The newly started Looking Glass instance should show your VM's display._
Using Looking Glass with a Dummy Display Plug
If you don't have or don't want a Dummy Display Plug, you can skip straight to the next section "Using Looking Glass with a Virtual Display Driver".
Finally, the moment of truth! Attach your USB-C dummy display, and start your VM. Once started simply enter the below into a terminal:
looking-glass-client
You'll get a window with the purple Looking Glass logo, but once Windows has loaded you should be presented with the Windows logon screen! Congratulations, you have your VM fully installed and working with Looking Glass!
There are some various flags/options you can run with Looking Glass. Here's what I use:
looking-glass-client -F -S -s
A breakdown of the flags:
-F- Makes the LG window fullscreen, you'll probably want this-S- Disables the screensaver (Not currently working in GNOME)-s- Disables LG's Spice client (If you're using Spice for your keyboard/mouse, don't use this flag or you'll have no way to interact with your VM!)
If you want to explore the various options available to you, use Looking Glass' --help flag to see them all.
Using Looking Glass with a Virtual Display Driver
The alternative to using a dummy plug is to use a Virtual Display by using IddSampleDriver made by roshkins on github. In this guide we are going to be using a fork from g9 since it has a convenient config file (options.txt) already included.
We can download the latest release from here.
After downloading it on our Windows Guest we are going to extract the zip in our C:/ directory. Next we are going to open the Command Prompt as an Administrator (right-click Command Prompt > "Run as Administrator") and move into the extracted folder by running this command:
cd \IddSampleDriver
Now we can go and install the driver by issuing this command:
.\certmgr /add .\IddSampleDriver.cer /s /r localMachine root
After that's done we can continue by opening the Device Manager.
From there click on any device --> click "Action" in the top panel --> "Add legacy hardware" --> click "Next" --> choose "Install hardware that I manually select from a list (Advanced)" --> click "Next" while "Show all devices" is selected --> Click on "Have disk" --> Click on "Browse" --> find "C:/IddSampleDriver/IddSampleDriver.inf" --> select it and click "ok" --> "Next" --> "Next" --> On the prompt click "Install"
And that's it! You should now have a virtual display in your display settings. If you want 120 or 240 or whatever refresh rate then create an options.txt file in C:\IddSampleDriver and add:
1920, 1080, 120
to the end of the text file. You can add as many resolutions and refresh rates in there as you like.
Now you just have to reboot your Windows Guest VM and you should now have 1080p 120Hz in the Display settings!
Also big thanks goes to the user ImaginationLatter523 from reddit (post) for making it known that it is possible to use Looking Glass without a dummy display plug!
Disable GNOME Screen Dimming (EvDev Only)
Unfortunately, due to the way GNOME handles things, the "disable screensaver" flag has no effect in GNOME. This means that if we're using EvDev for our VM input, no user input is sent to the host, and as a result GNOME will dim the screen and then blank it after the configured amont of time. This can be pretty annoying, but if you're like me, you're lazy and find it equally annoying to have to toggle these settings off and on every time you use your VM. Thankfully, we can use hook scripts to write to dconf as our user ID, so that we can disable these settings when we start the VM, then restore them to our preferred values!
First, create and save the following two files:
/etc/libvirt/hooks/qemu.d/win10/prepare/begin/50-dconf-settings.sh:
#!/bin/bash

## Load VM variables
source "/etc/libvirt/hooks/qemu.d/win10/vm-vars.conf"

## Set dconf keys to disable screensaver and screen blanking. This is
## needed as looking-glass disable screensaver doesn't work with Gnome
export LOGGED_IN_USERID
su $LOGGED_IN_USERNAME -c 'export DBUS_SESSION_BUS_ADDRESS=unix:path=/run/user/$LOGGED_IN_USERID/bus \
&& dconf write /org/gnome/settings-daemon/plugins/power/idle-dim false \
&& dconf write /org/gnome/desktop/session/idle-delay "uint32 0"'

sleep 1
/etc/libvirt/hooks/qemu.d/win10/release/end/50-dconf-settings.sh:
#!/bin/bash

## Load VM variables
source "/etc/libvirt/hooks/qemu.d/win10/vm-vars.conf"

## Set dconf keys to re-enable screensaver and screen blanking. This is
## needed as looking-glass disable screensaver doesn't work with Gnome
export LOGGED_IN_USERID
export GNOME_IDLE_DELAY
su $LOGGED_IN_USERNAME -c 'export DBUS_SESSION_BUS_ADDRESS=unix:path=/run/user/$LOGGED_IN_USERID/bus \
&& dconf write /org/gnome/settings-daemon/plugins/power/idle-dim true \
&& dconf write /org/gnome/desktop/session/idle-delay "uint32 $GNOME_IDLE_DELAY"'

sleep 1
Remember to make both of these files executable:
sudo chmod +x /etc/libvirt/hooks/qemu.d/win10/prepare/begin/50-dconf-settings.sh
sudo chmod +x /etc/libvirt/hooks/qemu.d/win10/release/end/50-dconf-settings.sh
Finally, we'll need to set our variable values. Open /etc/libvirt/hooks/qemu.d/win10/vm-vars.conf and find this section:
# To modify GNOME settings to disable the screensaver, we
# need to specify the username and ID. As well, when the
# VM is turned off, we need to restore the amount of idle
# time until the screen is turned off (in seconds)
LOGGED_IN_USERNAME=user
LOGGED_IN_USERID=1000
GNOME_IDLE_DELAY=900
Replace LOGGED_IN_USERNAME with your username, and LOGGED_IN_USERID with your user ID (this is almost always 1000). The GNOME_IDLE_DELAY is in seconds, so for the above example of 900, this means 15 minutes. After you've made these changes, save the file.
And there you have it! Now your screensaver/screen dimming settings will automatically turn off and on when you start/shutdown your VM!
Looking Glass Kill Script (Optional)
We can leverage our libvirt hooks to add a script that will automatically kill the Looking Glass client once we shut down the VM. This isn't required, but it's nice to have for our end goal of a single-click to use the VM. As a bonus, if you restart Windows, it won't kill Looking Glass, so you won't need to manually run Looking Glass again.
Create and save the following file:
/etc/libvirt/hooks/qemu.d/win10/release/end/60-kill-looking-glass.sh:
#!/bin/bash

## Load VM variables
source "/etc/libvirt/hooks/qemu.d/win10/vm-vars.conf"

## Kill Looking Glass
echo "Killing Looking Glass..."
killall looking-glass-client

sleep 1
Remember to make the file executable:
sudo chmod +x /etc/libvirt/hooks/qemu.d/win10/release/end/60-kill-looking-glass.sh
Your /etc/libvirt/hooks folder should look like this:
/etc/libvirt/hooks/
├── qemu
└── qemu.d
    └── win10
        ├── prepare
        │   └── begin
        │       └── 10-asusd-vfio.sh
        ├── release
        │   └── end
        │       ├── 40-asusd-integrated.sh
        │       └── 60-kill-looking-glass.sh
        └── vm-vars.conf
Now your Looking Glass client will automatically close once your VM shuts down.
Performance Tweaking
So far, we've gotten the basics of our VM working. Our dGPU is passed through, and Looking Glass is set up. Now it's time to really get our hands dirty and squeeze all the performance we can out of our VM. Let's dive in!
General Tips
Disable Memballoon
VFIO doesn't actually use memballoon. The XML won't let us remove the entry, but we can still remove the device from the machine by setting it to none.
Open your VM's XML config and find this line:
<memballoon model="virtio">
Replace it with the below line, then click Apply:
<memballoon model="none">
More Device Cleanup
While extra devices shouldn't normally cause issues, it's still something the VM needs to track, so we should remove any other devices we don't need.
Referencing the above image, here's what we should remove:
SATA CDROM 1- We already installed Windows so we don't need this anymoreSATA CDROM 2- We also already installed all needed VirtIO driversTablet- We already have our input devices, and this will actually cause issues if you're using Spice with Looking Glass
If you are not using Spice at all (Chapter 4 - Options 1-2), then you may remove both Display Spice and Video QXL.
However, if you are using Spice input with Looking Glass (Chapter 4 - Option 3), then you must keep Display Spice. Then, select Video QXL and click the XML tab. You'll see this:
<video>
  <model type="qxl" ram="65536" vram="65536" vgamem="16384" heads="1" primary="yes"/>
  <address type="pci" domain="0x0000" bus="0x00" slot="0x01" function="0x0"/>
</video>
Replace it with this and click Apply:
<video>
  <model type="none"/>
</video>
This will remove the QXL video device, but still allow you to use Looking Glass' Spice client for your keyboard and mouse.
Adding USB Devices
If you have a USB device, such as a headset, flash drive, etc., that you want to pass directly through to the VM, this is extremely easy to do.
Ensure your VM is shut down, and open your VM's configuration. Now click Add Hardware like you did when adding your dGPU. This time, choose USB Host Device instead of PCI Host Device. From here, select the device you want to pass through:
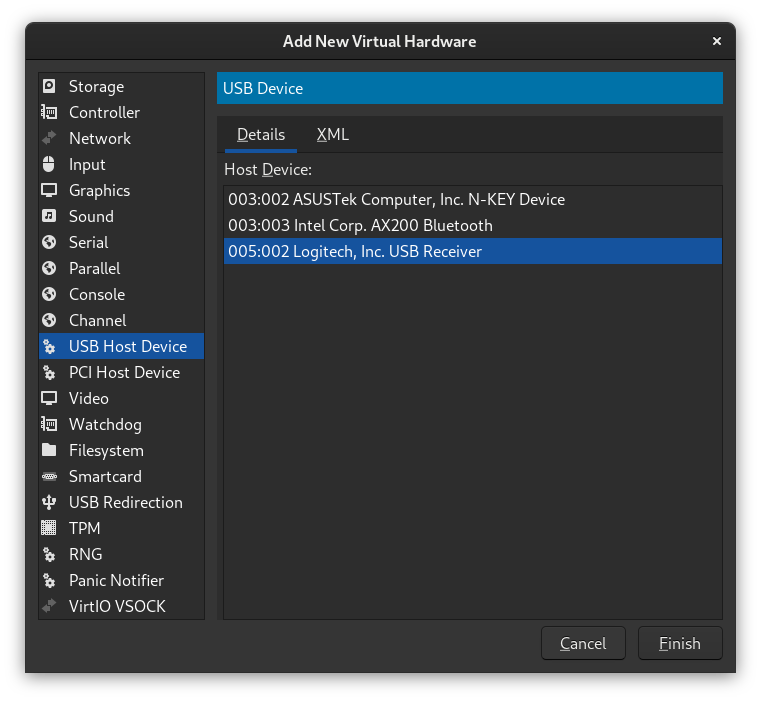
Once you click "Finish" you should see the USB device's ID listed with the other devices in your VM.
Note that any USB devices you pass through will need to be connected when you start that VM or it will not start! You can always remove and re-add USB devices from your configuration as your needs adapt.
Hyper-V Enlightenments
Regardless of what anyone tells you, Windows always knows whether or not it's running inside a VM. This is *not* a bad thing! We can leverage this to squeeze some extra performance out of our VM with certain enhancements that will help Windows run more efficiently within the VM by making Windows think it's running on a Hyper-V compatible hypervisor. This allows it to use Hyper-V specific features.
Go to your VM's XML and find this section:
    <hyperv>
      <relaxed state="on"/>
      <vapic state="on"/>
      <spinlocks state="on" retries="8191"/>
    </hyperv>
These are enhancements that libvirt enabled already for us based on the fact that we installed windows 10, but there are a few more we can add. Here they are along with explanations I've dumbed down from the QEMU documentation:
hv-vpindex- Provides an CPU index register for the VM, which is required for some of the other enlightenmentshv-synic- Enables Hyper-V Synthetic interrupt controller. This is required to enable Hyper-V synthetic timers. These times allow the VM to more efficiently perform tasks[Requires hv-vpindex]hv-stimer- Enables Hyper-V synthetic timers. Some Windows versions will revert to using HPET 106 or RTC clocks if this enlightenment isn't enabled, potentially causing excessive CPU consumption[Requires hv-synic]hv-reset- Allows the VM to reset itself by writing to a specific registerhv-frequencies- Allows the guest to obtain its frequencies without performing any measurements
To add the above enlightenments to your VM, the Hyper-V entry of your XML should look like this:
    <hyperv>
      <relaxed state="on"/>
      <vapic state="on"/>
      <spinlocks state="on" retries="8191"/>
      <vpindex state="on"/>
      <synic state="on"/>
      <stimer state="on"/>
      <reset state="on"/>
      <frequencies state="on"/>
    </hyperv>
Guest CPU Power Management
One issue with VM's is that they aren't able to manage the power state of the host CPU. Since we've isolated our host cores so that only the VM can use them, we can gain even more performance by allowing the VM to manage the power state.
This means that the Windows kernel in your VM can actually control the power state of the CPU's. To put in very simple terms, what it does is ensures the cores are always "powered on" for the VM. This means no time is wasted getting the host to "wake up" the cores for the VM.
We can add the following lines to our VM's XML in the <qemu:commandline> section:
   <qemu:arg value='-overcommit'/>
   <qemu:arg value='cpu-pm=on'/>
Once added, the entite <qemu:commandline> section should look like this (if you used EvDev for input, or JACK audio, you'll have those entries as well):
  <qemu:commandline>
    <qemu:arg value="-acpitable"/>
    <qemu:arg value="file=/home/user/vfio/acpitable.bin"/>
    <qemu:arg value='-overcommit'/>
    <qemu:arg value='cpu-pm=on'/>
  </qemu:commandline>
Memory Hugepages
By default, the Linux kernel deals with memory in blocks of 4 KiB. This can often be too slow, since modern hardware is able to quickly move around much larger blocks of memory. We can reserve a block of huge memory pages for our VM. While active, the host won't use these memory pages, and they'll be bigger, meaning they can be addressed faster.
You may have read on the Arch wiki that the VM automatically uses transparent hugepages. However, it does also state that when using PCI passthrough, they can't be used. IOMMU requires us to allocate and pin the VM's memory as soon as it starts, so it's required to statically allocate the hugepages in order to benefit from them.
Normally this needs to be done at boot via a kernel parameter, but we can allocate static hugepages on the fly as well.
Setup Hugepages On The VM
Configuring your VM to use hugepages is simple. Open your VM's XML and find this line (your number may be different depending on the amount you allocated):
<currentMemory unit="KiB">8388608</currentMemory>
Directly underneath it, paste the following:
  <memoryBacking>
    <hugepages/>
  </memoryBacking>
Click Apply, and that's it!
Allocating Hugepages
When using hugepages, you MUST allocate them before starting your VM, or the VM will not start. You should first see what size hugepages are enabled in your system. Most distros use 2 MiB hugepages by default. There is also an option of 1GiB pages, however I don't recommend using this. The performance gain isn't really that much, and it's difficult to have enough contiguous blocks of memory free to use them.
Enter this command to check your hugepages:
cat /proc/meminfo | grep -i huge
You'll get an output like the below:
AnonHugePages:         0 kB
ShmemHugePages:        0 kB
FileHugePages:         0 kB
HugePages_Total:       0
HugePages_Free:        0
HugePages_Rsvd:        0
HugePages_Surp:        0
Hugepagesize:       2048 kB
Hugetlb:         1048576 kB
You can see the Hugepagesize is 2048kB meaning we have 2 MiB hugepages. To figure out how many hugepages we need for our VM, we take the amount of our VM's memory in KiB, divided by the hugepage size, also in KiB.
A VM with 8 GiB of memory would be 8388608 KiB, so 8388608 / 2048 = 4096. To allocate them enter this command:
echo 4096 | sudo tee /sys/kernel/mm/hugepages/hugepages-2048kB/nr_hugepages
After doing this, check your hugepages again, and you should see HugePages_Total change from zero to your value. Sometimes, you'll see it's no longer zero, but all of your pages didn't allocate. This is because your RAM is too fragmented.
Thankfully, this can be corrected. The following commands can certainly be entered individually, but even a second or two between commands can cause you to still be unable to allocate all your hugepages, especially if you have a lot of memory currently in use. I've chained them here, so if you copy and paste the below they'll all process immediately after another:
echo 3 | sudo tee /proc/sys/vm/drop_caches && echo 1 | sudo tee /proc/sys/vm/compact_memory && echo 4096 | sudo tee /sys/kernel/mm/hugepages/hugepages-2048kB/nr_hugepages
First we drop memory caches to clear up as much memory as possible. Then we compact/defragment the remaining memory. Finally, we allocate the hugepages again. If you check your hugepages again, you should have all of the pages allocated.
If you still don't, that's okay. You could keep trying the command again. But thanksfully libvirt hooks can help us here! The next two scripts will allocate our hugepages before the VM starts, and then remove them after the VM is shut down.
Even better, the allocation script will keep trying to compact memory and allocate hugepages up to 1000 times and if it can't, it will reverse everything and quit. As long as you have enough free memory though, this approach should work. Create and save the two following files:
/etc/libvirt/hooks/qemu.d/win10/prepare/begin/20-reserve-hugepages.sh:
#!/bin/bash

## Load VM variables
source "/etc/libvirt/hooks/qemu.d/win10/vm-vars.conf"

## Calculate number of hugepages to allocate from memory (in MB)
HUGEPAGES="$(($VM_MEMORY/$(($(grep Hugepagesize /proc/meminfo | awk '{print $2}')))))"

echo "Allocating hugepages at 2048 KiB per page..."
echo $HUGEPAGES > /sys/kernel/mm/hugepages/hugepages-2048kB/nr_hugepages
ALLOC_PAGES=$(cat /proc/sys/vm/nr_hugepages)


## If successful, notify user
if [ "$ALLOC_PAGES" -eq "$HUGEPAGES" ]
then
    echo "Succesfully allocated $ALLOC_PAGES / $HUGEPAGES pages!"
fi


## Drop caches to free up memory for hugepages if not successful
if [ "$ALLOC_PAGES" -ne "$HUGEPAGES" ]
then
    echo 3 > /proc/sys/vm/drop_caches
fi

## If not successful, try up to 10000 times to allocate
TRIES=0
while (( $ALLOC_PAGES != $HUGEPAGES && $TRIES < 1000 ))
do
    ## Defrag RAM then try to allocate pages again
    echo 1 > /proc/sys/vm/compact_memory
    echo $HUGEPAGES > /sys/kernel/mm/hugepages/hugepages-2048kB/nr_hugepages
    ALLOC_PAGES=$(cat /proc/sys/vm/nr_hugepages)
    ## If successful, notify user
    echo "Succesfully allocated $ALLOC_PAGES / $HUGEPAGES pages!"
    let TRIES+=1
done

## If still unable to allocate all requested pages, revert hugepages and quit
if [ "$ALLOC_PAGES" -ne "$HUGEPAGES" ]
then
    echo "Not able to allocate all hugepages. Reverting..."
    echo 0 > /proc/sys/vm/nr_hugepages
    exit 1
fi

sleep 1
/etc/libvirt/hooks/qemu.d/win10/release/end/10-release-hugepages.sh:
#!/bin/bash

## Load VM variables
source "/etc/libvirt/hooks/qemu.d/win10/vm-vars.conf"

## Remove Hugepages
echo "Releasing hugepage memory back to the host..."
echo 0 > /sys/kernel/mm/hugepages/hugepages-2048kB/nr_hugepages

## Advise if successful
ALLOC_PAGES=$(cat /proc/sys/vm/nr_hugepages)

if [ "$ALLOC_PAGES" -eq 0 ]
then
    echo "Memory successfully released!"
fi

sleep 1
Remember to make them both executable:
sudo chmod +x /etc/libvirt/hooks/qemu.d/win10/prepare/begin/20-reserve-hugepages.sh
sudo chmod +x /etc/libvirt/hooks/qemu.d/win10/release/end/10-release-hugepages.sh
Once you're done, your /etc/libvirt/hooks/ folder should look like this:
/etc/libvirt/hooks/
├── qemu
└── qemu.d
    └── win10
        ├── prepare
        │   └── begin
        │       ├── 10-asusd-vfio.sh
        │       └── 20-reserve-hugepages.sh
        ├── release
        │   └── end
        │       ├── 10-release-hugepages.sh
        │       └── 40-asusd-integrated.sh
        ├── stopped
        │   └── end
        │       └── 10-kill-looking-glass.sh
        └── vm-vars.conf
Now, we'll set our memory amount. Open /etc/libvirt/hooks/qemu.d/win10/vm-vars.conf and find this section:
# How much memory we've assigned to the VM, in kibibytes

VM_MEMORY=8388608
Change the value of VM_MEMORY to same value you have stored in your VM's XML like we looked at in the start of this section, and save the file. Remember, if you change the amount of memory allocated to your VM in the future, you will need to update this variable in the hook config file as well.
That's it, your VM will now automatically allocate the hugepages before starting!
Setting CPU Governors
By default, most modern systems run the schedutil governor. However, to ensure the best performance possible, we should set our governor to performance when running our VM. This will keep the CPU locked to its maximum frequency. Not something we want for general usage or while on battery obviously, but for our VM it's extremely useful.
We can set the governor to performance with the following command before starting the VM:
echo "performance" | sudo tee /sys/devices/system/cpu/cpu0/cpufreq/scaling_governor
Now, repeat this for each CPU in your system.
Relax, I'm kidding! No one wants to do that, and we don't have to - libvirt hooks to the rescue! We'll also use our hook scripts to set which power profile our system uses with power-profiles-daemon.
Create and save the two following files:
/etc/libvirt/hooks/qemu.d/win10/prepare/begin/30-set-governor.sh:
#!/bin/bash

## Load VM variables
source "/etc/libvirt/hooks/qemu.d/win10/vm-vars.conf"

## Set CPU governor to mode indicated by variable
CPU_COUNT=0
for file in /sys/devices/system/cpu/cpu*/cpufreq/scaling_governor
do
    echo $VM_ON_GOVERNOR > $file;
    echo "CPU $CPU_COUNT governor: $VM_ON_GOVERNOR";
    let CPU_COUNT+=1
done

## Set system power profile to performance
powerprofilesctl set $VM_ON_PWRPROFILE

sleep 1
/etc/libvirt/hooks/qemu.d/win10/release/end/30-restore-governor.sh:
#!/bin/bash

## Load VM variables
source "/etc/libvirt/hooks/qemu.d/win10/vm-vars.conf"

## Reset CPU governor to mode indicated by variable
CPU_COUNT=0
for file in /sys/devices/system/cpu/cpu*/cpufreq/scaling_governor
do
    echo $VM_OFF_GOVERNOR > $file;
    echo "CPU $CPU_COUNT governor: $VM_OFF_GOVERNOR";
    let CPU_COUNT+=1
done

## Set system power profile back to powersave
powerprofilesctl set $VM_OFF_PWRPROFILE

sleep 1
As always, remember to make them both executable:
sudo chmod +x /etc/libvirt/hooks/qemu.d/win10/prepare/begin/30-set-governor.sh
sudo chmod +x /etc/libvirt/hooks/qemu.d/win10/release/end/30-restore-governor.sh
When you're done, your /etc/libvirt/hooks/ directory structure should look like this:
/etc/libvirt/hooks/
├── qemu
└── qemu.d
    └── win10
        ├── prepare
        │   └── begin
        │       ├── 10-asusd-vfio.sh
        │       ├── 20-reserve-hugepages.sh
        │       └── 30-set-governor.sh
        ├── release
        │   └── end
        │       ├── 10-release-hugepages.sh
        │       ├── 30-restore-governor.sh
        │       └── 40-asusd-integrated.sh
        │       └── 60-kill-looking-glass.sh
        └── vm-vars.conf
Now, open /etc/libvirt/hooks/qemu.d/win10/vm-vars.conf and find this section:
# Set the governor to use when the VM is on, and which
# one we should return to once the VM is shut down
VM_ON_GOVERNOR=performance
VM_OFF_GOVERNOR=schedutil

# Set the powerprofiles ctl profile to performance when
# the VM is on, and power-saver when the VM is shut down
VM_ON_PWRPROFILE=performance
VM_OFF_PWRPROFILE=power-saver
The defaults here should be fine for 99% of people, but if you normally use some other governor or power profile you can set it here. Your system will now automatically set the governor and power profile when you start/stop the VM.
Pinning CPUs
This is probably the single most impactful tweak you can make for performance when using a multithreaded CPU.
Some Background On CPU Topology
Consider that a Ryzen 7 4800HS has 8 physical cores, and 16 threads. 16 threads are also referred to as logical cores.
VM's can't tell the difference between physical and logical cores. Libvirt sees the 16 logical cores as 16 virtual CPU cores, or vCPUs. Meanwhile, the host knows that two vCPUs are siblings which map to one physical CPU core.
This is where CPU topology comes into play. Due to this guest limitation, it is extremely important that for every logical core we assign to our VM, we also assign its physical core sibling.
Most of us don't keep our CPU's topology memorised, but thankfully it's super easy to check using this command:
lscpu -e
This will output some data similar to the below. What we're interested in is which logical cores (CPU column) belong to which physical cores (CORE column). For example, we can see below that CPUs 0-1 belong to CORE 0, CPUs 2-3 to CORE 1, so on and so forth:
CPU NODE SOCKET CORE L1d:L1i:L2:L3 ONLINE    MAXMHZ    MINMHZ
  0    0      0    0 0:0:0:0          yes 2900.0000 1400.0000
  1    0      0    0 0:0:0:0          yes 2900.0000 1400.0000
  2    0      0    1 1:1:1:0          yes 2900.0000 1400.0000
  3    0      0    1 1:1:1:0          yes 2900.0000 1400.0000
  4    0      0    2 2:2:2:0          yes 2900.0000 1400.0000
  5    0      0    2 2:2:2:0          yes 2900.0000 1400.0000
  6    0      0    3 3:3:3:0          yes 2900.0000 1400.0000
  7    0      0    3 3:3:3:0          yes 2900.0000 1400.0000
  8    0      0    4 4:4:4:1          yes 2900.0000 1400.0000
  9    0      0    4 4:4:4:1          yes 2900.0000 1400.0000
 10    0      0    5 5:5:5:1          yes 2900.0000 1400.0000
 11    0      0    5 5:5:5:1          yes 2900.0000 1400.0000
 12    0      0    6 6:6:6:1          yes 2900.0000 1400.0000
 13    0      0    6 6:6:6:1          yes 2900.0000 1400.0000
 14    0      0    7 7:7:7:1          yes 2900.0000 1400.0000
 15    0      0    7 7:7:7:1          yes 2900.0000 1400.0000
My preferred method however is a more visual approach. You can use the command lstopo after installing the hwloc-gui package:
sudo dnf install hwloc-gui
Once completed, enter this command:
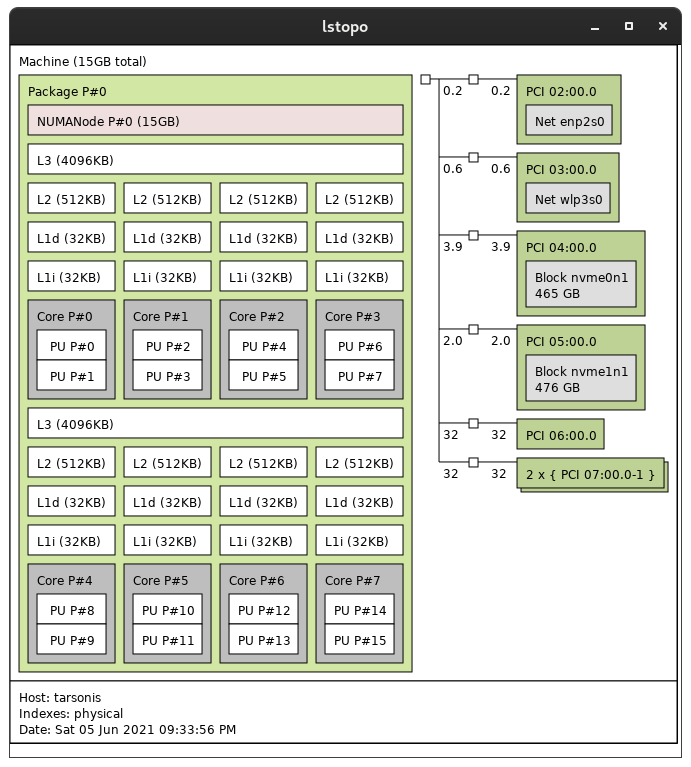
lstopo -p
This gives you a visual diagram of your CPU's physical topology. If you're like me, this is much easier to interpret, and also gives you some extra information which you might be interested in. Here's the output of my Ryzen 7 4800HS:
Understanding Which Cores To Pin
Note: I will be reworking this section often, as I learn more about the topic and perform testing to see what truly works better.
With Ryzen CPU's, utilities like lstopo are actually very helpful. Many Ryzen chips have multiple Core Complexes, or CCX. Each of these have their own set of cores with its own L3 cache.
Understanding this can be important in helping with low-latency applications in our VM's such as gaming and audio. Your VM won't typically respect the CCX boundary limits of the L3 cache. The VM's vCPU's will be trying to access L3 cache that actually belongs to another CCX instead of its own. This can cause L3 "cache thrashing", which can affect latency.
It is always best practice to only give entire CCXs to the guest whenever possible so that the entire L3 cache is shared along with it. Based on my lstopo output above, this is the "last half" of our cores (cores 4-7/CPUs 8-15), which should be plenty for most use cases.
If you require more power in your VM and need to give your VM additional cores, it's important to ensure that you are fully populating one CCX, and then assigning the remainder to other one. Referring again to the lstopo example above, if we wanted to give 6c/12t of our 8c/16t processor, then we'd want to pin our VM's CPUs in a way where we give physical cores 4-7, and then 2-3, or CPUs 8-15 and 4-7. This ensures the L3 cache is properly mapped/seen by the VM.
Intel CPUs don't use this manufacturing method, so this isn't a concern on them. There are also many AMD CPUs which only have one CCX. In both of these cases, since every core on the CPU uses the same L3 cache, this means you can pass through as many or as few cores as you like from these topologies without worrying about which ones to pass through. Just ensure that for any logical cores you use, that you are also using its physical core sibling as well!
This all assumes that your processor has only one NUMA node. If your CPU has multiple NUMA nodes, there is other optmisation required in order to get the best performance, but that is outside the scope of this guide (to my knowledge, none of our ROG laptops even have multiple NUMA nodes anyway).
How To Pin Your CPU's
Now that we've covered the why, it's time to cover the how and actually pin our CPU's. Open your VM's configuration and select CPU from the list. Then click Topology, and select the "Manually set CPU topology" checkbox
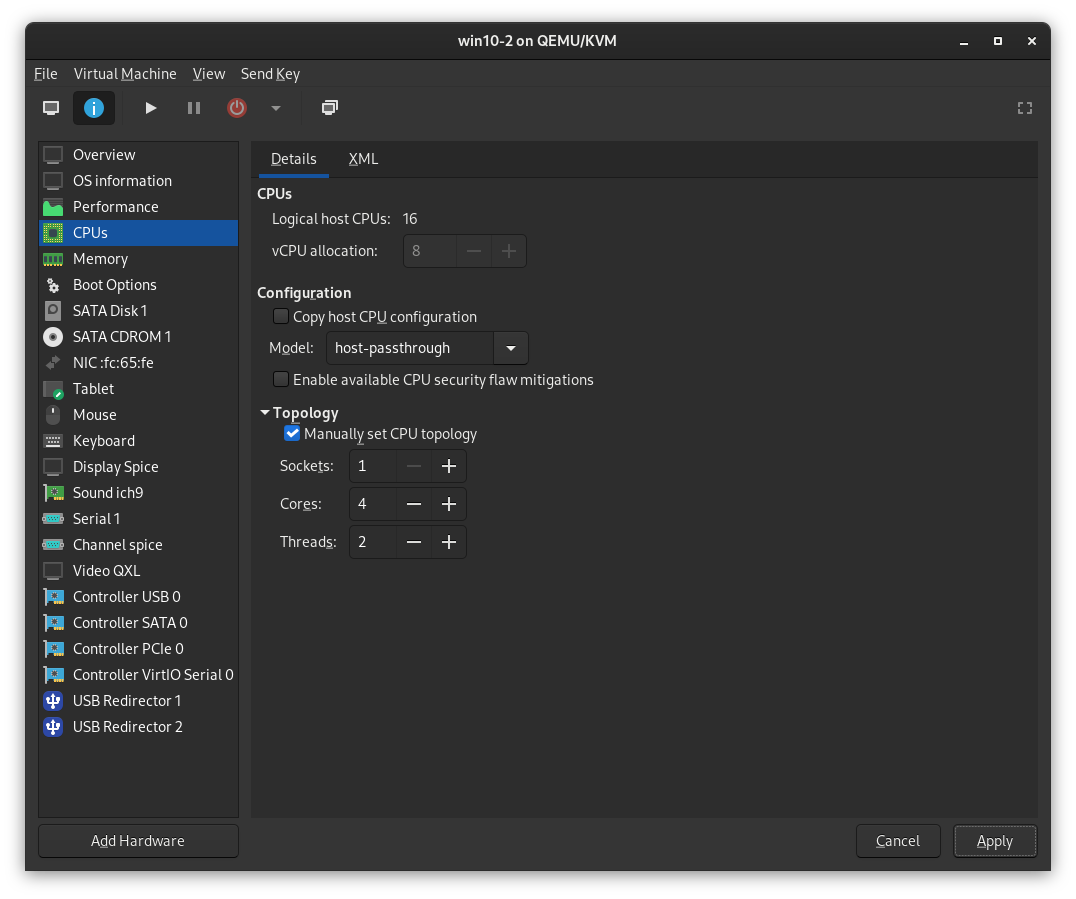
From here, ensure you choose 1 socket and 2 threads. Cores will be however many physical cores you will be giving to the VM. In the above example, I'm passing through 4 physical cores with 2 threads each, which gives me 8 vCPUs to allocate. Once you've made your selections, click Apply, and then click the XML tab.
Now, find the line in your XML which begins with the following:
<vcpu placement="static">
Directly below it we will add our XML to pin our CPU's. Let's say I want to pin all the physical cores on my 2nd CCX, or my "last" 4 cores. I'd add the following:
  <iothreads>1</iothreads>
  <cputune>
    <vcpupin vcpu="0" cpuset="8"/>
    <vcpupin vcpu="1" cpuset="9"/>
    <vcpupin vcpu="2" cpuset="10"/>
    <vcpupin vcpu="3" cpuset="11"/>
    <vcpupin vcpu="4" cpuset="12"/>
    <vcpupin vcpu="5" cpuset="13"/>
    <vcpupin vcpu="6" cpuset="14"/>
    <vcpupin vcpu="7" cpuset="15"/>
    <emulatorpin cpuset="0-7"/>
    <iothreadpin iothread="1" cpuset="0-7"/>
  </cputune>
Let's break this down. The <iothreads> entry defines how many threads for our VirtIO disk we'll be using. You can only use one iothread per VirtIO storage controller, so we've specified one thread. Adding more threads will not achieve anything.
Next, you'll notice we've mapped the vCPUs to the physical cores. vCPU 0 corresponds to logical core 8, 1 to 9, so on and so forth. This is based on your CPU's topology, so your entries will likely differ.
The one thing to ensure is that you are pairing your vCPUs with physical core siblings. Look at my XML example above and compare it to the lstopo screenshot. You'll notice how, for example, CPUs 8-9 on my system are mapped together on the VM as vCPUs 0-1, CPUs 10-11 mapped together to vCPUs 2-3 - you get the picture.
The emulator and iothreads should be pinned to the available host CPUs, not the VM ones. This should improve performance as these threads won't be competing with the VM's for scheduling.
In the above example, I've pinned the emulator to the first 4 host CPUs, then the remaining 4 to the iothread. The iothreads are dedicated threads for processing disk events. Play around with how many CPUs to use for your emulator to find what works best for you, but I find this to be a good balance.
Note: If you passed through an NVMe device, remove both the <iothreads> and <iothreadpin> entries as these won't do anything for you.
CPU Cache Passthrough
We should also be passing through our CPU cache to the VM, so the VM can properly use the L3 cache.
Find this section in your XML (your "cores" number may be different depending on what you've configured):
  <cpu mode="host-passthrough" check="partial" migratable="on">
    <topology sockets="1" dies="1" cores="4" threads="2"/>
  </cpu>
Edit the entry so it looks like the below, with added lines for cache and feature:
  <cpu mode="host-passthrough" check="partial" migratable="on">
    <topology sockets="1" dies="1" cores="4" threads="2"/>
    <cache mode="passthrough"/>
    <feature policy="require" name="topoext"/>
  </cpu>
Ensuring you add this is important for increased performance, especially on Ryzen CPU's!
Note: If you're using and Intel CPU, you can remove the line containing <feature policy="require" name="topoext"/> .
Isolating CPUs
While CPU pinning increases performance, there's still more we can do. Pinning our CPU ensures that the VM only uses the cores/threads we assign to it, but this doesn't stop the host from using these cores for other tasks.
We can isolate these cores and force the host to only use the cores we allow it to. This allows the cores assigned to the VM to only be used with the VM, which greatly improves performance, as the VM isn't competing with other running tasks for CPU cycles.
For example, I previously pinned my VM's vCPUs to CPUs 8-15 of the host (the last 4 cores). This means we would want to isolate the host to CPU's 0-7 (the first 4 cores).
Normally, this is done via a kernel parameter. However, doing it this way means that the cores are always isolated, even when the VM is not in use. This isn't very useful, as our machine would essentially be handicapped to half its full power, all of the time!
Thanks to systemd, we can easily isolate cores on the fly, and then return them to the host when the VM is not in use. Before we start the VM, we can enter the following commands:
sudo systemctl set-property --runtime -- user.slice AllowedCPUs=0-7
sudo systemctl set-property --runtime -- system.slice AllowedCPUs=0-7
sudo systemctl set-property --runtime -- init.scope AllowedCPUs=0-7
Each of these commands instructs the host to only use cores 0-7 for its tasks. If you want to see this working in real-time, pull up htop and enter the above commands. You'll notice that cores 8-15 will drop to 0% CPU usage.
After we shut down the VM, we can then return the cores to the host. The below commands will allow the VM to use all of the cores once again:
sudo systemctl set-property --runtime -- user.slice AllowedCPUs=0-15
sudo systemctl set-property --runtime -- system.slice AllowedCPUs=0-15
sudo systemctl set-property --runtime -- init.scope AllowedCPUs=0-15
Of course, you should know by now that I don't expect you to actually do that manually every time, I'm not that cruel! Time for more hook scripts!
These last two scripts will run the commands above to isolate our CPUs before starting the VM, and then return them to the host after the VM shuts down. Create and save the two following files:
/etc/libvirt/hooks/qemu.d/win10/prepare/begin/40-isolate-cpus.sh:
#!/bin/bash

## Load VM variables
source "/etc/libvirt/hooks/qemu.d/win10/vm-vars.conf"

## Isolate CPU cores as per set variable
systemctl set-property --runtime -- user.slice AllowedCPUs=$VM_ISOLATED_CPUS
systemctl set-property --runtime -- system.slice AllowedCPUs=$VM_ISOLATED_CPUS
systemctl set-property --runtime -- init.scope AllowedCPUs=$VM_ISOLATED_CPUS

sleep 1
/etc/libvirt/hooks/qemu.d/win10/release/end/20-return-cpus.sh:
#!/bin/bash

## Load VM variables
source "/etc/libvirt/hooks/qemu.d/win10/vm-vars.conf"

## Return CPU cores as per set variable
systemctl set-property --runtime -- user.slice AllowedCPUs=$SYS_TOTAL_CPUS
systemctl set-property --runtime -- system.slice AllowedCPUs=$SYS_TOTAL_CPUS
systemctl set-property --runtime -- init.scope AllowedCPUs=$SYS_TOTAL_CPUS

sleep 1
As before, remember to make them both executable:
sudo chmod +x /etc/libvirt/hooks/qemu.d/win10/prepare/begin/40-isolate-cpus.sh
sudo chmod +x /etc/libvirt/hooks/qemu.d/win10/release/end/20-return-cpus.sh
Your completed /etc/libvirt/hooks/ folder should now look like this:
/etc/libvirt/hooks/
├── qemu
└── qemu.d
    └── win10
        ├── prepare
        │   └── begin
        │       ├── 10-asusd-vfio.sh
        │       ├── 20-reserve-hugepages.sh
        │       ├── 30-set-governor.sh
        │       └── 40-isolate-cpus.sh
        ├── release
        │   └── end
        │       ├── 10-release-hugepages.sh
        │       ├── 20-return-cpus.sh
        │       ├── 30-restore-governor.sh
        │       └── 40-asusd-integrated.sh
        │       └── 60-kill-looking-glass.sh
        └── vm-vars.conf
Finally, open /etc/libvirt/hooks/qemu.d/win10/vm-vars.conf and find this section:
# Set which CPU's to isolate, and your system's total
# CPU's. For example, an 8-core, 16-thread processor has
# 16 CPU's to the system, numbered 0-15. For a 6-core,
# 12-thread processor, 0-11. The SYS_TOTAL_CPUS variable
# should always reflect this.
#
# You can define these as a range, a list, or both. I've
# included some examples:
#
# EXAMPLE=0-3,8-11
# EXAMPLE=0,4,8,12
# EXAMPLE=0-3,8,11,12-15
VM_ISOLATED_CPUS=0-7
SYS_TOTAL_CPUS=0-15
As the comments indicate, change the values of the two variables to match your configuration, then save the file. Going forward, every time you start the VM, the scripts will run and isolate/release your CPUs. If you make any changes to your VM's CPU configuration, you'll only need to edit the VM_ISOLATED_CPUS variable, as your total CPUs always be the same.
Looking Glass Performance Tweaks
Looking Glass already works extremely well, but we can get even more performance out of it!
Using NvFBC Instead of DXGI
** Note that NvFBC won't work together with the Virtual Display Driver! You will have to either use a dummy plug or an external monitor for NvFBC to work. **
By default, Looking Glass uses DirectX Graphics Infrastructure (DXGI) to stream framebuffers to the Linux host. However, it is capable of using Nvidia's Framebuffer Capture (NvFBC). Using this can reduce CPU usage on your VM. In fact, in testing from myself and some others in our community, we've seen up to 10% better performance!
The issue is that it's also only available on Quadro tier cards and higher. It *is* possible to get it working on GeForce cards with a workaround. Ping me on Discord if this is something you'd like to try!
If you do use this method, you may need to increase the size of the IVSHMEM block. I know for myself at 1080p resolution, using a 32 MiB block no longer worked. After remoting into my VM the Looking Glass logs indicated the memory block wasn't big enough.
If you encounter issues after enabling NvFBC, simply go to your VM's XML after shutting it down, and find your IVSHMEM section:
    <shmem name="looking-glass">
      <model type="ivshmem-plain"/>
      <size unit="M">32</size>
      <address type="pci" domain="0x0000" bus="0x0b" slot="0x12" function="0x0"/>
    </shmem>
Whatever size you're using, change it to the next power of 2. So in my case, I'd go from 32 to 64. If you were using 64, go to 128, and so on. After doing this, you'll need to either reboot, or delete the memory block and recreate it. This is easy thanks to our systemd-tmpfile method.
To delete it:
sudo rm /dev/shm/looking-glass
To re-create it:
sudo systemd-tmpfiles --create /etc/tmpfiles.d/10-looking-glass.conf
The Looking Glass Windows host application disables NvFBC by default, and requires you to set a flag to enable it. In order to do this, you'll need to create and save a file, looking-glass-host.ini, with the below contents:
[app]
capture=NVFBC
Then, move the file to C:\Program Files\Looking Glass (host). Once you do this, restart the VM (or restart the Looking Glass service if you're familiar with Windows services).
You should now be able to start the VM and use Looking Glass with increased performance. You can check the Looking Glass logs to confirm if you are indeed using NvFBC.
Direct DMA Upload (DMABUF)
We can still take things a step further. This improvement works whether you've enabled NvFBC or not! DMABUF is a feature that removes an intermediate CPU memory copy of the framebuffer by allowing the GPU to access the buffer directly from the shared memory block. The developer of Looking Glass, gnif, has advised that this module is targeted to laptop users (like our community), so it's highly recommended to use this to ensure we are getting all the performance possible out of our VM!
We can enable this with a kernel module which comes with Looking Glass. I prefer to install the module into DKMS so that it survives across kernel upgrades.
If you don't have DKMS installed already, install it:
sudo dnf install dkms
Next, if you still have your Looking Glass source files (if not, just re-download and extract the source for the version you're using), navigate to it, and cd into the module folder. Once inside the folder, enter the following command to install the DKMS module:
sudo dkms install .
Now, modprobe the module with the static_size_mb parameter, which should be equal to the size of your current IVSHMEM block(64 MiB in my case):
sudo modprobe kvmfr static_size_mb=64
This will create a device /dev/kvmfr0 which represents the KVMFR interface. To actually use it, you'll need to modify the ownership on this file:
sudo chown user:kvm /dev/kvmfr0
Next, we need to modify our VM's XML. Find our entry with <qemu:commandline>, and add the new KVMFR interface as shown below, changing the size=64M to match what you require:
  <qemu:commandline>
    ...
    <qemu:arg value='-device'/>
    <qemu:arg value='ivshmem-plain,id=shmem0,memdev=looking-glass'/>
    <qemu:arg value='-object'/>
    <qemu:arg value='memory-backend-file,id=looking-glass,mem-path=/dev/kvmfr0,size=64M,share=yes'/>
  </qemu:commandline>
Note: QEMU 6.2 and libvirt 7.9 introduced breaking changes to the syntax. Users running QEMU 6.2 or later and libvirt 7.9 or later, should use this XML block instead:
<qemu:commandline>
  ...
  <qemu:arg value="-device"/>
  <qemu:arg value="{'driver':'ivshmem-plain','id':'shmem0','memdev':'looking-glass'}"/>
  <qemu:arg value="-object"/>
  <qemu:arg value="{'qom-type':'memory-backend-file','id':'looking-glass','mem-path':'/dev/kvmfr0','size':67108864,'share':true}"/>
</qemu:commandline>
Note: The 'size' tag represents the size of the shared memory device in bytes. Make sure you replace it with your value. To calculate size in bytes:
size_in_MB x 1024 x 1024 = size_in_bytes
Using the legacy syntax on QEMU 6.2/libvirt 7.9 may cause QEMU to abort with the following error message:
error: internal error: ... PCI: slot 1 function 0 not available for pcie-root-port, in use by ivshmem-plain
After doing this, you'll also need to remove the entire IVSHMEM section from your your XML:
    <shmem name="looking-glass">
      <model type="ivshmem-plain"/>
      <size unit="M">64</size>
      <address type="pci" domain="0x0000" bus="0x0b" slot="0x12" function="0x0"/>
    </shmem>
You'll also want to remove the old systemd-tmpfiles entry since we will no longer need to generate the old shared memory block. We'll remove the shared memory block itself as well. Enter the below chained command:
sudo rm /etc/tmpfiles.d/10-looking-glass.conf && sudo rm /dev/shm/looking-glass
Finally, edit /etc/libvirt/qemu.conf and find the ACL list we added in the EvDev device section, and add "/dev/kvmfr0" so it looks like the below (refer back to the EvDev Input section if you need to):
cgroup_device_acl = [
    "/dev/input/by-id/KEYBOARD_NAME",
    "/dev/input/by-id/MOUSE_NAME",
    "/dev/null", "/dev/full", "/dev/zero",
    "/dev/random", "/dev/urandom", "/dev/ptmx",
    "/dev/kvm", "/dev/rtc", "/dev/hpet", "/dev/kvmfr0"
]
Save the file, then restart the libvirtd service:
sudo systemctl restart libvirtd
Start the VM, and run Looking Glass with this additional flag (if you have other flags, they'll still work fine, just ensure this flag and its option are at the end):
looking-glass-client -f /dev/kvmfr0
You should see Using DMA buffer support in the terminal while running Looking Glass if you've done this properly!
Now that we've confirmed it works properly, we just need to add a few things so that the kernel module automatically loads at boot and the permissions are properly set, so we don't need to go through the setup steps every time we want to use the VM.
First create a file /etc/modules-load.d/kvmfr.conf and save it with the below content to load the module at boot:
#KVMFR Looking Glass Module
kvmfr
Next, create a file /etc/modprobe.d/kvmfr.conf and save with the below content to set the size at boot (again, ensure the value matches what you are using):
#KVMFR Looking Glass Module
options kvmfr static_size_mb=64
Finally, we will create a new udev rule. Create and save the below file (remember to replace user with your username):
/etc/udev/rules.d/99-kvmfr.rules:
SUBSYSTEM=="kvmfr", OWNER="user", GROUP="kvm", MODE="0660"
After creating these, you should be able to reboot and use Looking Glass with DMABUF!
Note: Remember that any time you update the Looking Glass client to a new version, you should also reinstall the DKMS module
One-Click Launcher
We've put in a ton of work to get ourselves set with an awesome VM that performs like a dream. When we start it, it configures all of our performance options for us. But if you can't tell, I love going all-out. We can add a desktop file entry so that we can simply start our VM from our application launcher without ever opening the virt-manager application. It's all led to this moment so let's get into it!
You may have noticed I don't have a script to start Lookinig Glass. You can certainly add one if you want, but there's a reason I do not add one, keep reading.
First things first, let's add the VM icon. I've created a nice little Windows 10 icon we can use, but of course you can use anything you wish.
Enter the chained command below. It will create the necessary directory in your home folder if it does not exist, and then download the icon to the correct directory:
mkdir -p ~/.local/share/icons/hicolor/256x256/emblems && wget https://asus-linux.org/files/vfio/Win10Logo.png -O ~/.local/share/icons/hicolor/256x256/emblems/Win10Logo.png
Next, create and save the following file:
~/.local/share/applications/windows-vm.desktop:
[Desktop Entry]
Type=Application
Version=1.0
Name=Windows Virtual Machine
GenericName=Start Windows Gaming VM
Comment=Launches a Windows VM with dedicated graphics for high-performance applications
Exec=sh -c "virsh --connect=qemu:///system start win10; sleep 13; looking-glass-client -F -S -s -f /dev/kvmfr0;"
Icon=Win10Logo
Terminal=false
Categories=Application;Games;System
You can edit the Name, GenericName, Comment, and Categories fields to suit your tastes. The rest should be left alone, with the exception of the Exec field.
If you will be using Looking Glass, use the following, substituting my flags with your preferred ones:
Exec=sh -c "virsh --connect=qemu:///system start win10; sleep 13; looking-glass-client -F -S -s -f /dev/kvmfr0;"
If you're not using Looking Glass, and just an external display, then use this one:
Exec=sh -c "virsh --connect=qemu:///system start win10"
That's it! You should be able to see the entry for the VM in your application launcher, and click it to start your VM with (or without) Looking Glass!
Conclusion
Congrats, you did it! Give yourself a pat on the back...or a beer! Thanks for reading to the end, and I hope this guide has been both helpful and informative. If you notice any errors, or have any concerns, questions, or whatever! - Just ping me on Discord!