Where are the DKMS modules?
Archived. All patches that were used to make those modules are now upstreamed. For the best ASUS experience please ensure you are using the minimum of 5.13 kernel.
Linux for ROG
Notebooks
The below is a collection of questions that we receive quite frequently - either via GitLab reports or our Discord community. Before opening an issue on GitLab or asking in our Discord, check here first to see if your question has already been addressed!
If nothing below addresses your issue, please ask in this appropriate channel on our Discord server.
Archived. All patches that were used to make those modules are now upstreamed. For the best ASUS experience please ensure you are using the minimum of 5.13 kernel.
If you have a 2021 G15 and use a second NVMe drive you might experience a problem while using s0ix (s2idle) resulting in a delayed system suspend.
The problem lies within a faulty DSDT table and the secondary NVMe drive does not enter suspend properly.
With an updated DSDT table you can apply the necessary patches to make it suspend properly.
https://gitlab.com/smbruce/GA503QR-StorageD3Enable-DSDT-Patch
Important: This is not necessary if you want to use S3 (see above). It applies only if you want to further use the standard suspend method s0ix.
Fixed in kernels versions 6.1.x and up.
BIOS versions 408 & 409 cannot boot a Linux kernel newer than 5.15.x so you will need to upgrade to the 410 bios here.
Supergfxctl v5.0.0+ now supports switching between Hybrid, Integrated and Vfio modes on the Flow X13.
Be sure to consider the following:
If you still experience an issue, hold down the power button while on battery for a few seconds to force a shutdown. This often helps to reset some things.
These steps are not needed if you are running Linux exclusively.
Depending on your kernel version, you may occasioinally experience issues with the 2021/2022 versions of the Zephyrus G14/G15 which affects the proper use or newer suspend methods, like s0ix.
A potential fix is to patch your DSDT tables so your machine uses the older suspend method, called S3. In our tests this works great on the 2021 / 2022 G14 and G15. Those patches are not part of the main repo and can't be. It will always be a manual matter and cannot be integrated into the kernel.
Important: If you update the BIOS be sure you disable your DSDT table and create a new one. DSDT tables could change with newer BIOS versions!
You can find the script here: https://gitlab.com/marcaux/g14-2021-s3-dsdt
Only Fedora (current version) and OpenSUSE Tumbleweed officially. Other distros may have packaging, or you will need to compile and install it yourself.
This function is now integrated into the ROG Control Center, so long as you run it in the background you will get the notifications.
You can find all notify settings in the "System Settings" in the ROG Control Center.
After BIOS version 313, ASUS fix ACPI support for Linux, which is crucial if you want Performance mode to work properly.
And ASUS optimized power distribution between CPU and GPU, which before caused stuttering/frame drops in performance mode that confuse many users for a long time.
Custom fan curves (not speaking of the built in power profiles) are currently only supported on Ryzen ROG laptops.
The necessary kernel patches are merged since 5.17.
The format is shown here.
There are three fan profiles namely Quiet, Balanced and Performance to choose from. Each profile is linked to power profile and gets applied when the power profile is set. You can enable/disable the fan profiles using the following command:
asusctl fan-curve -m <profile_name> -e true/false
All three fan profiles can be activated at once. If no profile is activated manually then the fan curve from the BIOS is used.
To change the fan curve data for a specific profile use the following command:
asusctl fan-curve -m <profile_name> -D <fan_curve_data>
Check the logs with sudo journalctl -b -u asusd and look for errors.
Please ensure you are using a recent kernel. As of now the minimum is 5.11, but please use at least 5.13 so that you get all the most recent patches and fixes for ASUS laptops.
Ensure you are using kernel 5.11 at minimum. We recommend to use at least 5.13 so that you get all the most recent patches and fixes for ASUS laptops.
It's also possible that your laptop doesn't support this so if the kernel update doesn't solve this feel free to make a :sadface: (sorry).
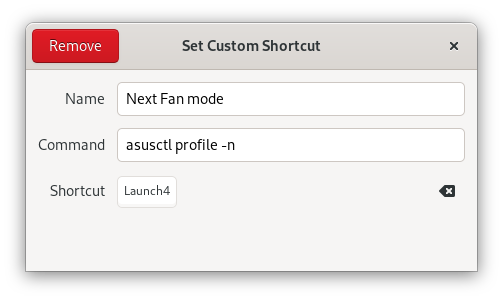
You need to map the key-combo to an action in your desktop, like this:
The daemon isn't running, check the logs with sudo journalctl -b -u asusd and look for errors.
After checking the usual suspects:
One possible culprit might also me realtime audio kit being enabled:
security.rtkit.enable = true
This service can probe all available audio devices, which includes nvidia hdmi audio!
As of version 510.60.02, NVIDIA still doesn't support dynamic boost on AMD CPUs. This is a known issue might get fixed in some future release.
Since version 525.53, NVIDIA added official Dynamic Boost support for AMD laptop that uses Ryzen 6000 Series (or newer) CPU.
To enable it, follow the next steps:
sudo systemctl start nvidia-powerd.service
If you don't want to start it manually each time, then:
sudo systemctl enable nvidia-powerd.service
Notice: There is a known bug that nvidia-powerd process uses excessive CPU after you offload the prime run application. You can stop by:
sudo systemctl stop nvidia-powerd.service
Update: version 530.41.03/525.105.17 and newer driver fixed this issue. Now you can enable nvidia-powered without worrying about high CPU usage.
You can do it in many ways. If you already installed asusctl, you can switch to it using:
asusctl profile -P Performance
or ROG Control Center (GUI) to set it.
Besides, you can enable it using your DE control panel (such as KDE/GNOME).
If you didn't see any option in DE panel, then you need to check if the "power-profiles-daemon" package was properly installed.
Using tools like "nvtop" and "mangohud", you can monitor your CPU and GPU power in realtime.
To check if the Dynamic boost works, you need to identify what is the MAX TGP your model support. Usually, it can be found on manufacturers' websites.
Here are some power data collected from Zephyrus G15 (2022), which rated 120 watt MAX TGP.
Quiete Mode: 25 Watt (CPU) + 60 Watt (GPU)
Balanced Mode: 30 Watt (CPU) + 80 Watt (GPU)
Performance Mode: 25 Watt (CPU) + 115 Watt (GPU)
This problem mostly appears when you connect your external display to the dGPU in Hybrid mode (rendering screens on separate GPUs). There are various reasons that can cause this problem and we don't have a perfect solution for it yet. One way to mitigate it is: if your model supports video via USB-C and one of the USB-C ports takes the signal from iGPU, then buy a USB-C to HDMI/DP cable or dongle. this way, you can avoid rendering two screens on separate GPUs. (tested on 2022 Zephyrus G15)
Use X11 instead of Wayland.
If your model supports video via USB-C and one of the USB-C ports takes the signal from iGPU, then buy a USB-C to HDMI/DP cable or dongle. this way, you can avoid rendering two screens on separate GPUs. (tested on 2022 Zephyrus G15)
There's a few steps to troubleshoot.
journalctl -b -u supergfxd
If there are lines which end with ERROR: Could not find dGPU, then reboot into Windows and make sure that Armoury Crate has the dGPU set to Auto Mode. If you have set it to iGPU only mode, then the dGPU will be forcibly removed from the system and Linux will no longer be able to see it.
If you no longer have Windows installed, and you suspect that it was set to iGPU only mode when you installed Linux, then you can try to forcibly enable the dGPU with the following.
echo 0 | sudo tee /sys/devices/platform/asus-nb-wmi/dgpu_disable
echo 1 > sudo /sys/bus/pci/rescan
echo 0 | sudo tee /sys/devices/platform/asus-nb-wmi/dgpu_disable
It may take a few tries to enable it, and a reboot is recommended afterwards.
In hybrid or nvidia mode they should be loaded, check with lsmod |grep nvidia for similar to:
[luke@datatron]$ lsmod |grep nvidia
nvidia_drm             65536  11
nvidia_modeset       1232896  18 nvidia_drm
nvidia_uvm           1150976  0
nvidia              34185216  906 nvidia_uvm,nvidia_modeset
drm_kms_helper        274432  2 nvidia_drm,i915
drm                   618496  14 drm_kms_helper,nvidia_drm,i915
if that doesn't show similar, then you need to reinstal your Nvidia drivers.
/etc/default/grub:GRUB_CMDLINE_LINUX="rd.driver.blacklist=nouveau modprobe.blacklist=nouveau"
that line may not be exact, and do not delete existing entry to match it, just add those two items to the end of the line before the last "
journalctl -b -u asusd say after a failed switch?If it contains lines like the following then we need to look at active sessions
asusd[1373]: INFO: GFX: Switching gfx mode to integrated
asusd[1373]: INFO: GFX: display-manager thread started
asusd[1373]: WARN: GFX: thread time exceeded 3 minutes, exiting
Do: loginctl list-sessions, if it shows more than one session lets have a look with:
loginctl show-session --property Type --property Class --property Active <num>
where <num> is the number or char+num from the SESSION column of the output above.
If there is more than one active session of type Wayland | X11 | Mir then somehow
you've ended up with an extra session.
Save your work, Ctrl+Alt+F4 (or any F<num>) key to a TTY terminal session and run
asusctl graphics -m <desired mode>
sudo loginctl kill-user <username>
your display-manager should then restart.
sudo sed -i 's/#KillUserProcesses=no/KillUserProcesses=yes/' /etc/systemd/logind.conf
then sudo systemctl restart display-manager.
Yes, you can.
Yes! Similar to remapping the Arrow-Keys above, you can remap - say the menu (fn+RightCtrl) key to SysRq.
Just add another line to /etc/udev/hwdb.d/90-nkey.hwdb with the following, including the leading whitespaces:
KEYBOARD_KEY_<ScanCode>=sysrq # force remap sysrq to Fn+RightCtrl
You can get the <ScanCode> by running
evtest /dev/input/by-id/usb-ASUSTeK_Computer_Inc._N-KEY_Device-*-kbd
and pressing the RightCtrl key.
In this case, it is 70065
Testing ... (interrupt to exit)
Event: time 1662839073.640933, type 4 (EV_MSC), code 4 (MSC_SCAN), value 70065 <--------- Substitute this as <ScanCode>
Event: time 1662839073.640933, type 1 (EV_KEY), code 127 (KEY_COMPOSE), value 1
Event: time 1662839073.640933, -------------- SYN_REPORT ------------
Then update hwdb with:
sudo systemd-hwdb update
sudo udevadm triggerNo, the key is on a physically different circuit and used to physically signal the keyboard EC to switch key circuits.
There are three different circuits for the 0x8166 keyboard.
Yes, create a file named /etc/udev/hwdb.d/90-nkey.hwdb with:
# Format evdev:input:b<bus_id>v<vendor_id>p<product_id>

# ** Note **
# The line evdev:input:b0003v0B05p1866* may vary on your ASUS Laptop.
# Modify the <vendor_id> and <product_id> based on the output of this command to ensure remaps work:
# $ lsusb | grep 'ASUSTek Computer, Inc. N-KEY Device' | awk -F'[: ]' '{print $7" "$8}' | tr '[:lower:]' '[:upper:]'

evdev:input:b0003v0B05p1866*
  KEYBOARD_KEY_c00b6=kbdillumdown # Fn+F2 (music prev)
  KEYBOARD_KEY_c00b5=kbdillumup   # Fn+F4 (music skip)
  KEYBOARD_KEY_ff3100c5=pagedown  # Fn+Down
  KEYBOARD_KEY_ff3100c4=pageup    # Fn+Up
  KEYBOARD_KEY_ff3100b2=home      # Fn+Left
  KEYBOARD_KEY_ff3100b3=end       # Fn+Right
then update hwdb with:
sudo systemd-hwdb update
sudo udevadm trigger
You can see a list of keycodes here.
You may have a different keyboard. Please request support in one of the related projects on gitlab, or in the discord server.
ASUS and ROG Trademark is either a US registered trademark or trademark of ASUSTeK Computer Inc. in the United States and/or other countries.
Reference to any ASUS products, services, processes, or other information and/or use of ASUS Trademarks does not constitute or imply endorsement, sponsorship, or recommendation thereof by ASUS.
The use of ROG and ASUS trademarks within this website and associated tools and libraries is only to provide a recognisable identifier to users to enable them to associate that these tools will work with ASUS ROG laptops.
Matomo is an open source web analytics platform. A web analytics platform is used by a website owner in order to measure, collect, analyse and report visitor data for purposes of understanding and optimizing their website.
Matomo is used to get an idea how our website is used by our users so we can optimize things further so that the user may find the most relevant information more quickly.
And also:
This list can be completed with additional features such as:
The processing of personal data with Matomo is based on legitimate interests
If you wish us to not process any personal data with Matomo, you can opt-out from it at any time. There will be no consequences at all regarding the use of our website.
You can withdraw at any time your consent by clicking here
If you think that the way we process your personal data with Matomo analytics is infringing the law, you have the right to lodge a complaint with a supervisory authority.