If you have any additional info whatsoever, please please please open a PR at the gitlab page. It was incredibly hard and time consuming to get to where I did and I would love to make a definitive article about this.
Please note that this article is WIP.
Changelog:
- 2021-01-11
- Initial post
I (Luke) recently took up kernel hacking just so I could get my fancy new laptop working on par with Windows under Linux. The first step of that journey was to get the internal USB keyboard working correctly with all expected Fn+Key combinations emitting correct key codes, keyboard backlight brightness control, keyboard backlight effects, and per-key LED settings. It was a fair amount of work but mostly pretty easy once I got the USB packets required.
Next up is sound. And since this part was actually pretty hard to find infomation about I'm going to write about what I did.
Symptoms
For my laptop, an ASUS GX502GW, the audio jacks didn't work. For another laptop the ASUS G14, the laptop speakers didn't work, nor did headset mic. In general something won't be working as expected, or on par with Windows. Laptops seem to come with a variety of parts to make sound - this laptop used: Intel, Nvidia (for HDMI/DP sound), and Realtek for the codec controller. I think most laptops use the Realtek codec.
The problem lay with the Realtek. There's a bunch of different ones, and different configurations, and then vendor customizations on top of that. Total minefield of garbage as bas as Android versions.
Getting dumps
The first thing you'll need is Windows installed - so don't wipe it out until you get some information. Second thing you need is RtHDDump_V236.zip; a tool I had great difficulty discovering actually existed.
You should get dumps from this tool with as many different configurations as you
can relating to what doesn't work correctly in Linux. So if the jacks aren't
working then plug in a headphone then dump, a headset then dump to a new file,
a mic, dump to new file again, and leave them unplugged etc. Make sure to name
each in an easy format like win_codec-unplugged. Put these somewhere you can
access them in Linux.
Next you need to get Linux dumps, which is dead easy compared to Windows. Run these commands:
echo 1 |sudo tee /sys/module/snd_hda_codec/parameters/dump_coef
then we need to find the Realtek codec path, do ls /proc/asound/ and see how
many card<n> directories there are. For each do grep "Codec: Realtek" /proc/asound/card<n>/codec#0 to see which contians that (replace <n> with card number.
cat /proc/asound/card0/codec#0 > lin_codec-dump
Diffing stuff
Two easy things to check are pincfg and verbs. pincfg being the easier one of those two.
pincfg
Open a windows dump (any of) and at the top of the file you'll see similar:
Wid=12  Codec=90A60120  Drv=90A60120  Loc=00000000
Wid=13  Codec=40000000  Drv=40000000  Loc=00000000
Wid=14  Codec=411111F0  Drv=411111F0  Loc=00000000
Wid=15  Codec=411111F0  Drv=01211420  Loc=00000000
Wid=16  Codec=411111F0  Drv=411111F0  Loc=00000000
Wid=17  Codec=90170110  Drv=90170110  Loc=00000000
Wid=18  Codec=411111F0  Drv=411111F0  Loc=00000000
Wid=19  Codec=411111F0  Drv=01A11050  Loc=00080000
Wid=1A  Codec=411111F0  Drv=01A11830  Loc=00020200
Wid=1B  Codec=411111F0  Drv=411111F0  Loc=00000000
Wid=1D  Codec=40600001  Drv=40600001  Loc=00000000
Wid=1E  Codec=411111F0  Drv=411111F0  Loc=00000000
Wid=1F  Codec=411111F0  Drv=411111F0  Loc=00000000
Wid=21  Codec=411111F0  Drv=411111F0  Loc=00000000
this breaks down like this:
Wid=12is aNodeon the codec, the Linux equivalent isNode 0x12and you will see this in the Linux dump you did.Codec=90A60120is a default pincfg as set by the codec chip itself. Each of these will be the same in Linux asPin Default 0x90a60120:in the dumpDrv=90A60120is what the Windows driver sets the pincfg to, here, there is no change.
So let's note the lines that changed:
Wid=15  Codec=411111F0  Drv=01211420  Loc=00000000
Wid=19  Codec=411111F0  Drv=01A11050  Loc=00080000
Wid=1A  Codec=411111F0  Drv=01A11830  Loc=00020200
And in the linux dump these correspond to:
Node 0x15 [Pin Complex] wcaps 0x40058d: Stereo Amp-Out
  Amp-Out caps: ofs=0x00, nsteps=0x00, stepsize=0x00, mute=1
  Amp-Out vals:  [0x80 0x80]
  Pincap 0x0001001c: OUT HP EAPD Detect
...

Node 0x19 [Pin Complex] wcaps 0x40048b: Stereo Amp-In
  Amp-In caps: ofs=0x00, nsteps=0x03, stepsize=0x27, mute=0
  Amp-In vals:  [0x00 0x00]
  Pincap 0x00003724: IN Detect
...
Node 0x1a [Pin Complex] wcaps 0x40048b: Stereo Amp-In
  Amp-In caps: ofs=0x00, nsteps=0x03, stepsize=0x27, mute=0
  Amp-In vals:  [0x00 0x00]
  Pincap 0x00003724: IN Detect
I've left some info off which we don't need to worry about yet. Node 0x15 is
a Stereo Amp-Out with OUT HP EAPD Detect capabilities. Interesting... the
others are input amps. Sometimes the pincfg is enough to get you started on the
right track (as it was with the GX502 and GA401). To quickly test this sort of
thing the Linux kernel gives you a nice gadget in the form of a 'firmware patch'
you can have applied on boot - let's try it.
Create these two files:
#/etc/modprobe.d/alsa-base.conf
options snd-hda-intel patch=alc-sound-patch.fw
#/lib/firmware/alc-sound-patch.fw
[codec]
0x10ec0294 0x10431881 0

[pincfg]
0x15 0x01211420
0x19 0x01A11050
0x1a 0x01A11830
The line 0x10ec0294 0x10431881 0 you need to change by looking at the Linux
dump. You should see near the top, similar to:
Vendor Id: 0x10ec0294
Subsystem Id: 0x10431881
which changes your line to match. Reboot, and see what changed with the pincfg.
hdajacksensetest, hdajackretask
Now is the time to learn about hdajacksensetest. This should be available in
alsa-tools in your distro. The node 0x19 for me is a mic input on the headset.
Plugging in a headset and running hdajackretask showed
Pin 0x19 (Black Mic, Left side): present = Yes
Pin 0x1a (Black Mic, Rear side): present = No
huh? Where's the headphones?
There's another tool; hdajackretask. Let's run that one. When it opens you'll
see a drop-down menu - select the ALC codec, and then Show unconnected pins
and Advanced override.
There's a lot of nodes to go through sorry.
Each node has Override, Connectivity, and Jack detection. Between this and
hdajacksensetest we should be able to discover which node the headphone jack
is. For each node that has a device selection of 'Headphone' available I set
- Override
- All options relevant to jack type and position
- Jack Detection = Present
and then checked results with hdajacksensetest, then unset them if there was
no change. The node I wanted is 0x21.
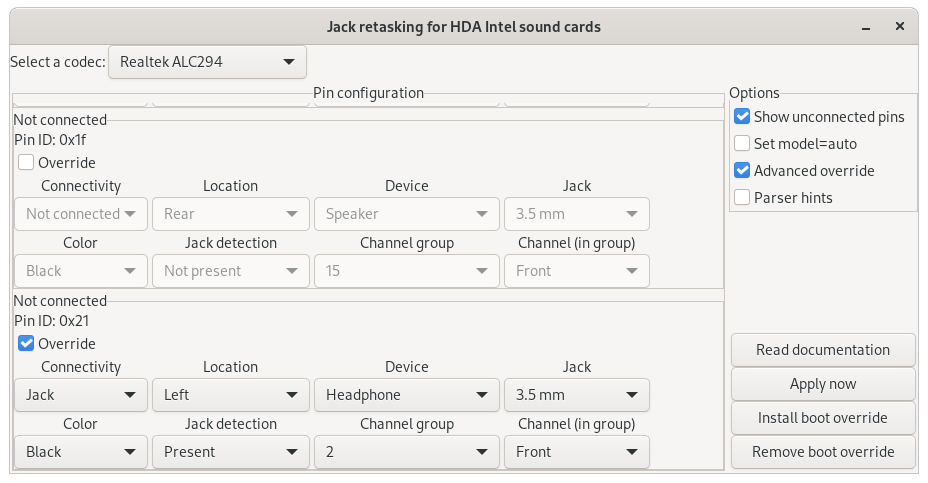
While you're in this page, you can set the jack details for the jacks you know
to correctly match their actual physicals. The channels should match the Windows
driver channels though, e.g, 0x01A11050 is front, channel group 5 (50).
When you click Apply the app spits out what was changed in the terminal:
0x12 0x90a60120
0x13 0x40000000
0x14 0x411111f0
0x15 0x411111f0
0x16 0x411111f0
0x17 0x90170110
0x18 0x411111f0
0x19 0x03a11050
0x1a 0x01a11830
0x1b 0x411111f0
0x1d 0x40600001
0x1e 0x411111f0
0x1f 0x411111f0
0x21 0x03a11050
you
can copy the set nodes to the /lib/firmware/alc-sound-patch.fw, for example I
replaced node 0x19 with 0x19 0x03a11050.
Did we get all jacks? Great. Reboot, and onwards in to the woods.
verbs
Verbs... I had jacks working by now. But no headphone sound, or mic. Now was time to divine the secrets of the cosmos through the power of verbs.
In the Windows dumps, at node 0x20 there is a whole pile of lines like Index 0x00 0x3004.
Using whatever method you want, grab that block of lines and put it in
a new file windows-verbs-no-headpone and do this for each Windows dump, while
naming the file suitably. Next use vimdiff:
$ vimdiff windows-verbs-no-headpone windows-verbs-headpone
to show you which lines changed. Or do
sdiff windows-verbs-no-headpone windows-verbs-headpone |grep '|' > windows-headphone-diff
You want to get yourself a nice little table like this:
| No Headphones | Headphones | Jack-detect off, no headphones |
|---|---|---|
| Index 0x0F 0x7770 | Index 0x0F 0x7778 | Index 0x0F 0x7774 |
| Index 0x45 0x4089 | Index 0x45 0xC089 | Index 0x45 0xD089 |
| Index 0x46 0x0004 | Index 0x46 0x02F4 | Index 0x46 0x0224 ? |
| Index 0x6B 0x4278 | Index 0x6B 0x0278 | ? |
You also want to diff the Windows and Linux dumps. Don't worry, you only need the
'no headpones' dump since we want to see what the Windows driver is changing from
defaults. Grab the Node 0x20 block of Coeff 0x00: 0x3004 and convert to same
format as Windows dump (use an editor with column select to change lower case to
upper). The do a diff of the Linux verbs to Windows.
This is the pile I came up with (yours will be different):
Index 0x06 0x6215
Index 0x07 0x0200
Index 0x09 0x0021
Index 0x0C 0x802B
Index 0x10 0x8A20
Index 0x35 0x096A
Index 0x36 0x5757
Index 0x3B 0x60D9
Index 0x43 0x3D90
Index 0x49 0x0249
Index 0x62 0xA007
Index 0x6E 0x0C25
Now it's time to test all these and see what they do. Most of them may not do much, if anything. To test you need 1. index, 2. verb. So for each, do:
hda-verb /dev/snd/hwC0D0 0x20 0x500 0x06
hda-verb /dev/snd/hwC0D0 0x20 0x400 0x6215
and do a full sound check, making notes of what changed (or didn't). The 0x500
in that command is index select on node 0x20, then 0x400 is write to that index
on node 0x20. I discovered:
0x20 0x10 0x8A20 // Enables headphones but kills speakers? On in all Windows dumps
                 // 0x22 changes, from 0x19 0x1a 0x1b 0x12* to 0x19* 0x1a 0x1b 0x12
but, I still had no headphone speaker sound. Time to dig deeper...
Apologies dear reader, I started writing this article on 2020-07-27, but then work took over all my time and I was unable to finish in a timely manner. Coming back to it now I have to try and refresh myself and remember what I did. Please bear with me (Raaawwww!).
hda-analyser
To get any further we're going to need hda-analyser. Download
and run that with sudo python2 hda-analyzer/hda_analyzer.py.
Okay so, about here I'm going by memory now. In that app you will notice a series of nodes;
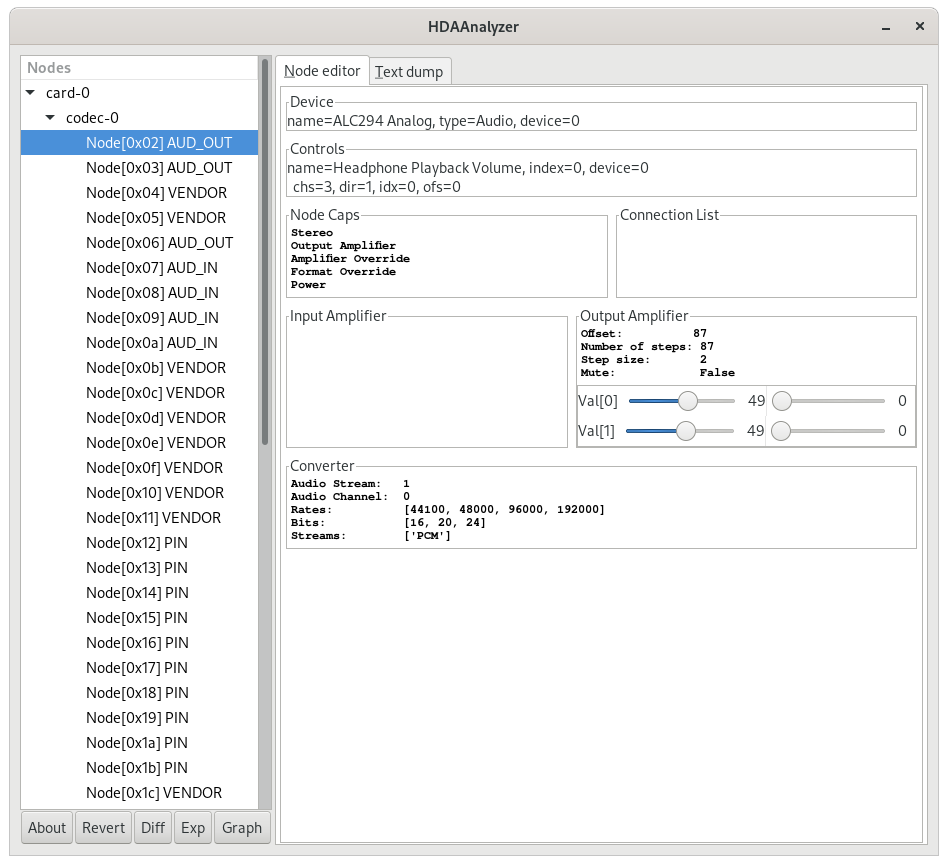
These are all connected in a map of sorts. For my laptop the headphones relied on:
- 0x02 (output)
- 0x14, 0x15, 0x16 (amplifiers)
- 0x21 (pin config, headpones, switches output)
You can see which ones are linked in the map by looking at the "Connection List", for the GX502 it shows 0x14, 0x15, 0x16, and 0x21 are connected to 0x02, which is the headphones.

You will notice in the above image that 0x15 has the Output muted. The same is true for 0x14 and 0x16. What happens if I go through and unmute each? Gasp!, 0x15 unmuted gave me sound out! Okay cool, so how do we set that with a verb?
Not quite... I must have performed an extra step, going by the kernel patch.
The below snippet is the code I wrote to enable the 0x15 amp in kernel:
	[ALC294_FIXUP_ASUS_GX502_VERBS] = {
		.type = HDA_FIXUP_VERBS,
		.v.verbs = (const struct hda_verb[]) {
			/* set 0x15 to HP-OUT ctrl */
			{ 0x15, AC_VERB_SET_PIN_WIDGET_CONTROL, 0xc0 },
			/* unmute the 0x15 amp */
			{ 0x15, AC_VERB_SET_AMP_GAIN_MUTE, 0xb000 },
			{ }
		},
		.chained = true,
		.chain_id = ALC294_FIXUP_ASUS_GX502_HP
	},
See 0x15, AC_VERB_SET_PIN_WIDGET_CONTROL, 0xc0? There is a related item in hda-analyser. I must have
been toggling through things in related combos to see what works. At this point I'd discovered that the
verb setting 0x20 0x10 0x8A20 toggles the laptop speakers off, and while off, setting the above in
hda-analyser gave headphone output but unplugging the headphones left laptop speakers off. That meant
that 0x20 0x10 0x8A20 needed to be toggled.
Back to setting the verbs with hda-verb. The related verbs here are SET_PIN_WIDGET_CONTROL and
SET_AMP_GAIN_MUTE. Running those with hda-verb gives you an output showing which hex value the command
was, like so:
[luke@datatron]$ sudo hda-verb /dev/snd/hwC0D0 0x15 SET_AMP_GAIN_MUTE 0xc0
nid = 0x15, verb = 0x300, param = 0xc0
With all that out of the way and tested manually, we can prepare a new patch test:
#/lib/firmware/alc-sound-patch.fw
[codec]
0x10ec0294 0x10431881 0

[pincfg]
0x15 0x01211420
0x19 0x01A11050
0x1a 0x01A11830

[verb]
0x15 0x707 0xc0
0x15 0x300 0xb000
Booting with this then using the following:
switches to headphone
hda-verb /dev/snd/hwC0D0 0x20 0x500 0x10
hda-verb /dev/snd/hwC0D0 0x20 0x400 0x8a20
switches to internal
hda-verb /dev/snd/hwC0D0 0x20 0x500 0x10
hda-verb /dev/snd/hwC0D0 0x20 0x400 0x0a20
works! Now, time to do a kernel patch....
Writing a kernel patch
With the firmware patch in hand we now have a very good model/template for a proper kernel patch available. If you're unsure of being able to do this yourself please post the firmware patch in a relevant bug tracker so someone else can create the kernel patch.
TODO:
- kernel hackery to trigger verbs on jack change
- explain some topics a bit better, like routing